by Rose Walker
Anybody who is a sweet tooth loves cupcakes. All those yummy creamy little cakes topped with cherry are an all-time favorite for most sweet lovers. But have you ever thought of using these yummy delicacies on your nails? Well, not literally of course, but in the form of nail art! If you haven’t already, then now’s the time. It’s never late! Here we have 15 cute cupcake nail art tutorials for you to paint those yummy cupcakes onto your nails.
1. Cupcake with a Cherry on Top

This beautiful cupcake nail art can be created with a few simple steps. First, paint your nails with a pastel blue polish and let it dry. Next, paint half your nail with a dark pink polish and let dry. Then, to create the wrapper effect, choose a darker pink polish color than the previous ones and draw vertical lines on your nails with a dotting tool. Once dry, use your dotting tool to draw a wavy line with white polish for the icing. Paint the rest of your nail leaving a little of your base coat to show, with the white polish. Decorate your cupcake with small blue polish, the same as your base coat, lines. Complete the look by drawing a cherry, and you’re done!
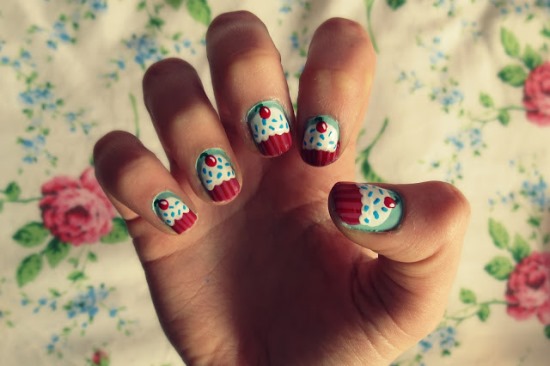
Image Credit: blogspot
2. Cupcakes with Colorful Icing
To create these cupcake nails you first apply a glossy pink polish as your base coat. Then, using different colors of your choice do a French tip for the cups. You then draw vertical lines with a darker shade of the same color. Using a dotting tool, create swipes with different polish colors for the icing. Once dry, decorate your cupcake with the dotting tool, and top it off with a heart shaped rhinestone and you’re done.
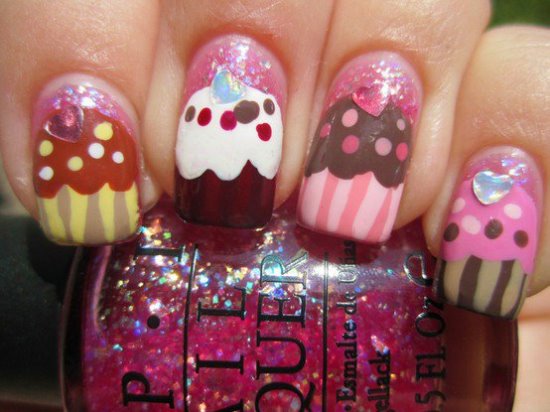
Image Credit: fashiondivadesign
3. Cupcake with Chocolate Icing
This nail art tutorial will help you recreate this gorgeous cupcake design on your nails. Start with a sheer yellow polish as your base coat and let it dry. Then, using a light pink polish do French tip to make the cups. You then draw vertical lines in the cup with a darker pink shade. Using a dotting tool, create swipes with a chocolate polish color for the icing. Once dry, decorate your cupcake with the dotting tool using different pastel polish colors, and top it off with a heart shaped rhinestone and you’re done!
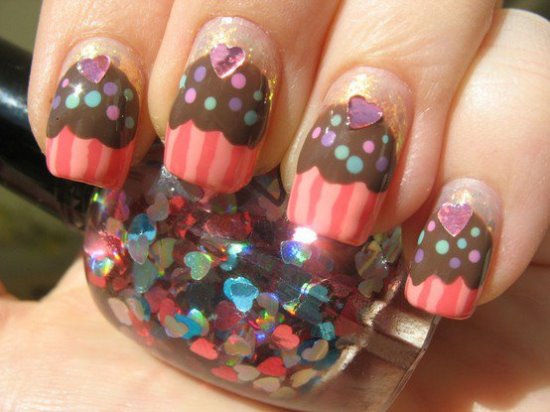
Image Credit: fashiondivadesign
4. Cupcake with Colorful Sprinklers
For these cupcake nails, apply a base coat of your choice, which will work as the cup color. Then, using a nail art pen or a nail art brush, draw 5 thin vertical stripes on your nails. Once dry, draw a thick line of any polish color of your choice across half your nail for the cake, and let it dry. Then with a polish color of your choice for the cake icing, create three blobs over the thick line you just created. Fill in the remaining portion of your nails to complete the cake. Next, create a blob of polish color on the tip of your nail for creating the cherry. Then, using different colors create sprinklers on your cake with a dotting tool. Having followed this nail tutorial, you’ll recreate this gorgeous cupcake nail design on your nails.
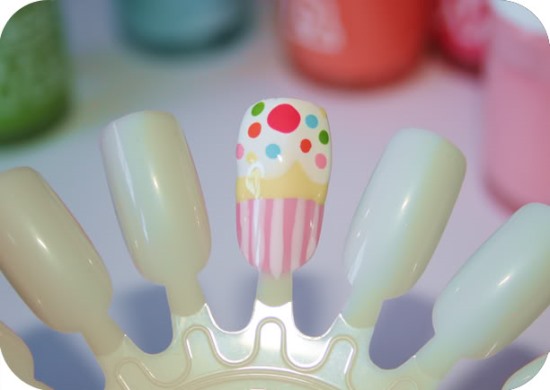
Image Credit: photobucket
5. Cupcake with Caviar Beads Icing
For creating this cupcake nail design, you will require a base coat (optional), skin color polish, transparent polish, magenta polish, dark purple polish color, light orange polish, light pink acrylic color, light yellow acrylic color, light purple acrylic color, white acrylic color, nail art brush, caviar beads of different colors, and a toothpick. Start by applying two coats of your base coat followed by two coats of skin polish. Remember to let each coat dry before moving on to the next one. Then, paint French tip on all your nails with different polish colors as shown and let it dry. Using a nail art brush, create the icing of the cake with the white acrylic color. Then create stripes on your cups with contrast colors coupled with white as shown and let it dry. Once dry, apply the transparent polish on top, and immediately dip the sharp end of a toothpick into the transparent polish. Then take the caviar beads and apply them onto your nails one by one, making it look like tutti fruities in the cake. Use the caviar beads to create the cherry too. And there you are with those gorgeous cupcake nails!
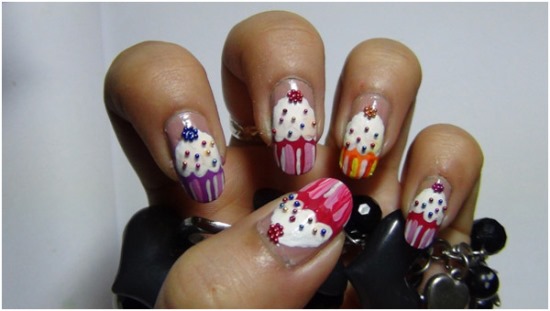
Image Credit: stylecraze
6. Strawberry Cupcake Nail Art
Start by painting your nails with an opaque pink for the base coat. Once dry, use a dotting tool to create an irregular icing on your cake with white polish. Complete the look by creating sprinklers using a darker pink shade of polish. And using this nail tutorial there you are with a gorgeous cupcake design on your nails.
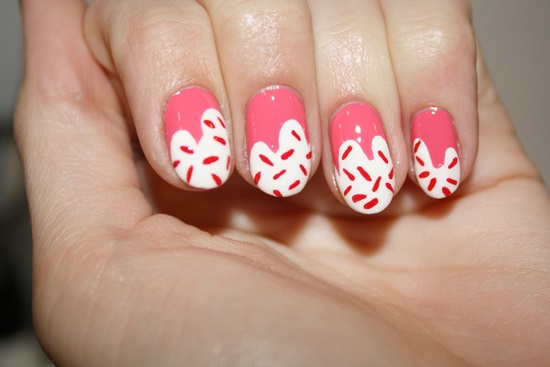
Image Credit: wordpress
7. Blueberry Cupcake with a Cherry
Create this nail art by applying a base coat. Then apply single coat of a hue of your choice except one nail upon which you will be making your cupcake. On that finger, you will make a French tip instead. Next, you draw vertical stripes on the nails. For the icing of the cupcake, take a dotting tool and create three wide swoops with white polish. Once done, fill in the remaining part of the cupcake. To complete the look on your cupcake nails, add sprinklers using colors of your choice and draw a heart shaped cherry with your dotting tool.
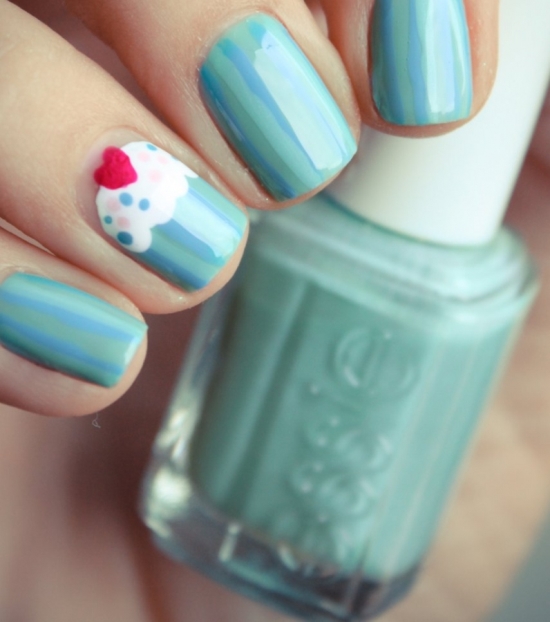
Image Credit: becomegorgeous
8. Pinstriped Cupcake Nail Art
This easy nail art tutorial will allow you to create this simple and cute cupcake design on your nails. Start by applying a nude color base coat. Next, apply light pink polish as your base coat. Leave one of the nails blank on which you do French tip instead. Once dry, take a darker shade of pink, and draw vertical stripes using a dotting tool or a nail art brush. For the cupcake, use a thicker dotting tool to create the icing of the cupcake and let it dry. Using the pink polish used for your base coat, create small dots for sprinklers. Complete the look by creating a heart shaped cherry on top of the cupcake.
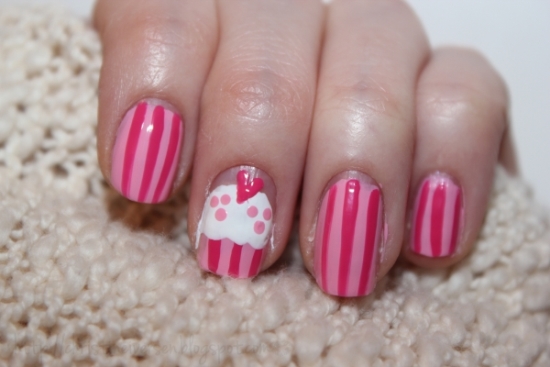
Image Credit: theacrylicnails
9. Vanilla Cupcake Nail Art
If you are a fan of cupcakes, then you may definitely have a vast choice when it comes to cupcakes. You can choose any of your favorite cupcake for your cupcake nail art too. As shown in the image below, you can recreate a vanilla cupcake on your nails. Start by doing French tip on all your nails with a bright orange color and let it dry. Next, choosing a darker shade say for example red, draw vertical lines on the cup of your cake and let it dry. Use white polish color for your cupcake icing which you will create using a dotting tool. You can then decorate your cupcake just the way your actual cupcake looks like, say for example it has a cherry on top of it or sprinklers. Create them on your cupcake and there you are with those gorgeous cupcake nails.
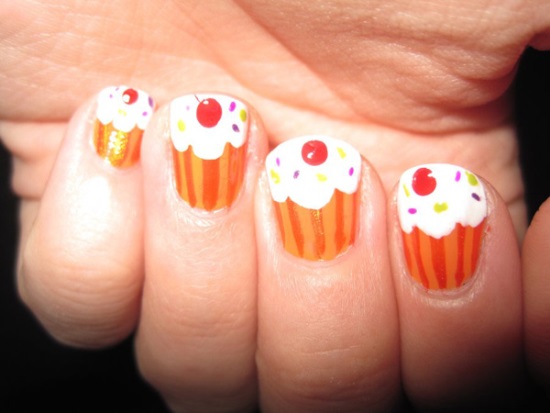
Image Credit: girlydesignblog
10. Cupcake Nail Art with a 3D Icing Effect
To create this cupcake nail design that gives a bit of a 3D effect, start by applying a clear polish as your base coat. Once dry, do French tip on all your nails with dark orange polish color and let it dry. Next, create the cups of your cupcake with yellow polish on the tip of your nails. Using a thin brush or a nail art brush, create stripes and border of the cup with black polish. Next, make the cupcake icing with blue polish on two of your nails, red polish on another two and with green polish on the last nail. To give a 3D effect to your cupcake, create strokes of black and white on the icing. Complete the look by creating sprinklers with white polish using a dotting tool.
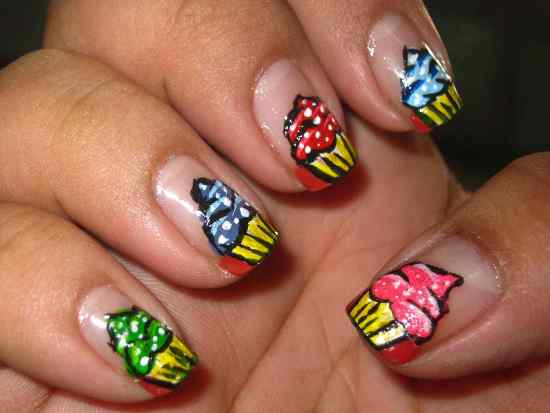
Image Credit: topnailideas
11. Cupcake with a Heart Shaped Cherry Topping
Follow this cupcake nail art tutorial to create this gorgeous design on your nails. Start by applying a clear sparkle polish color for your base coat. Then, for the cup use pink polish to make French tip on all your nails and let it dry. Then draw vertical lines on the cup with purple polish to create a contrast. For the icing of your cupcake, create three wide swoops with a thick dotting tool dipped in white polish. Create a semicircle, leaving a little portion of your nail for the cherry. Once you are done with the icing, create sprinklers on your nails with different polish colors of your choice. Top your cupcake off with a heart shaped cherry. Apply a top coat and you’re done!
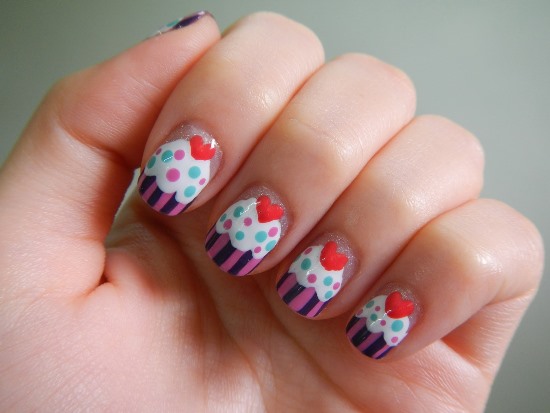
Image Credit: blogspot
12. Blue Cupcake with a Purple Base
For recreating these cupcake nails, start off by applying purple polish as a base coat. Next, using light blue polish do French tips on all your nails and let it dry. To create the wrapper effect of the cup of your cupcake, use a darker shade of blue polish and draw vertical stripes. Then, using white polish, create the cupcake icing such that it shows a part of your base polish. Use the base polish color and a dark pink polish for creating sprinklers with your dotting tool. Add a cherry on your cupcake using a thick dotting tool dipped in the same dark pink polish used for sprinklers. Finish off by applying a top coat!
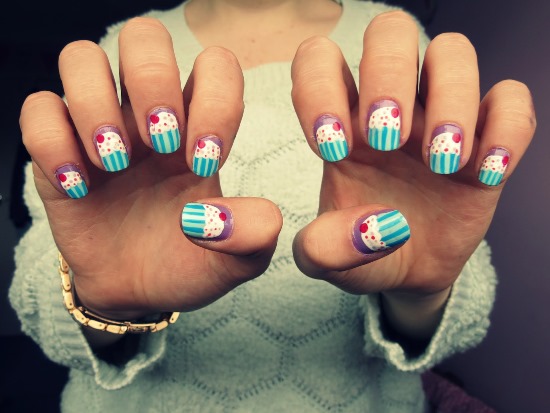
Image Credit: blogspot
13. Red Polka Dot Cupcake Nail Art
Start recreating this cupcake nail art by painting light pink as your base coat and let it dry. Next, do French tip with a slightly darker shade of pink polish on two of your middle fingers and let dry. Using a nail art brush or a thin brush create a cloud with white polish on both the nails over the French tip. Then, paint the remaining nails with red polish and draw stripes on the French tip with the same. Using glitter paint, create sprinklers on the two white clouds and finish the cupcake with a heart shaped cherry on top. For the remaining nails, using a dotting tool, make polka dots with white polish. Apply a top coat and you’re done!
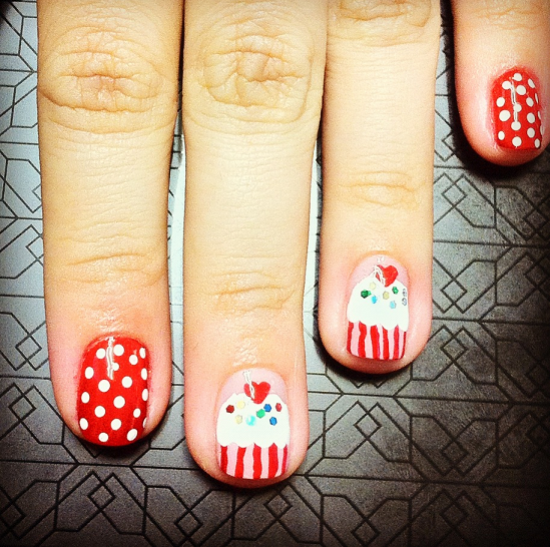
Image Credit: wordpress
14. Colorful Cupcake Nail Art
This amazing cupcake design can be easily created by following this nail tutorial. Start by applying a clear base coat on all your nails. Then paint all your nails with a different color, which will be the cupcake wrapper. Next, paint the top half of your nails with white polish to make the icing of your cupcake. Then, using a thin brush, outline the wrapper with black polish and add a couple of vertical lines within to create details. You can also add stripes of white polish to give it a detailed look. Lastly, use a thin dotting tool to add sprinkler on the icing of various colors of your choice. Finish the look by adding a cherry on top and applying a top coat.
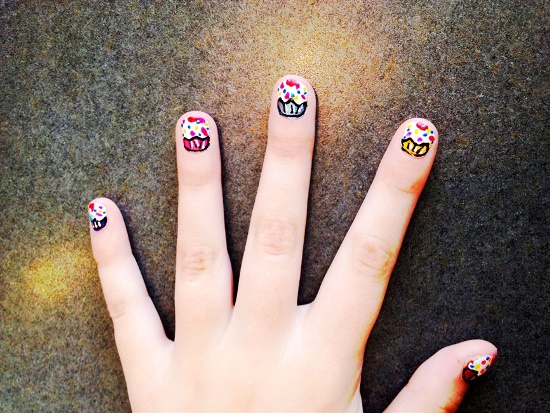
Image Credit: nailsmag
15. Pink Striped and Polka Dot Cupcake Nail Art
For recreating these cupcake nails, start by applying a light pink base coat on all your nails. Apply a baby pink polish color on the first and last finger, a darker shade of pink on the second finger and your thumb nail. On the third nail, do French tip with the dark pink polish. Then, using a dotting tool, create three large swoops with white polish and create the icing of your cupcake. For sprinklers, apply colorful rhinestones on the icing and a red rhinestone at the top for the cherry. Using a thin brush or your nail art brush, create vertical stripes on the cup of your cupcake while slanting lines on the nails with dark pink polish. Use your dotting tool to make polka dots on the first and the last finger. Apply a top coat and you’re done!

Image Credit: nailsmag
 |
 |
 |
 |

About Rose Walker
Rose Walker has worked as a nail artist for over 10 years. She's gained a lot of experience and developed her own unique style during that time. When she was working at a famous nail salon, she met Shirlyn. The two of them quickly became friends, and eventually decided to start their own website together. Naildesignideaz is the result of their collaboration - it's a website where they share their experience and offer tips on how to create beautiful nails.
 |
 |
 |
 |
Popular Posts