by Rose Walker
Negative space nails look fashionable and they are going to make a comeback this spring with a bang. These nails, though, are simple, yet, at times can involve a lot of intricate work and hence I am here to guide you ladies and show you some cool and inspiring negative space nail art tutorials that are simple to follow and you can do these at home. Have a look and get started!
1. Black and Nude Negative Space Nail Art
To get this amazing nail art, you would need glossy paint as top coat, tapes, nail paint in black. Begin with applying a base coat of glossy nail polish. Dry and then paste tapes, on the base and on the tips. Now, paint with black nail polish on the base of each nail. Dry. Then, paint each tip of your nail with another coat of black. Clean the cuticles and paint a glossy polish as top coat.

Image Credit: littleredtote
2. Pink Heart Valentines Negative Space Nail Art
Coat your nails with peach nail pint or light pink. Dry, then using white nail polish, paint the other nails. Then, with a brush dipped in acetone, remove the paint slowly to reveal nude nails. To create negative space on the pink nail, start pasting beads in the form of a heart, then begin erasing or scratching off the paint from inside the heart till you can see your nail’s actual color.

Image Credit: nailthataccent
3. Horizontal Negative Space Nail Art
Start by painting your nails with a clear coat nail polish, then dry. Now cut strips of the tape and paste it on your nails in a horizontal fashion, just like in the image. Then start painting nails with silver, white and black polish as shown. Dry the nails and then peel off the tapes. Paint with a top coat of clear nail polish.

Image Credit: fashiondivadesign
4. Negative Space Flower Nail Art
Negative space nail art with flowers looks charming and stylish. To get these nails, coat your nails with a top coat of light pink polish. Dry. Now, using a dotting tool, make dots as shown. Make these in a way so as to maintain enough distance between two dots. Now, paint some stokes in peach using your nail art brush. Dry. You have to repeat this step and make use of other shades for the petals. Once dry, layer your nails with a top coat.

Image Credit: divinecaroline
5. Cut Out Negative Space Nail Art
Among the listed nail tutorials, the ‘Cut Out’ negative space nail design is perhaps one of the simplest. You would need a base coat polish, top coat polish, any two polishes that you like, black nail paint, a piece of paper and a brush. Paint a tinted base coat and dry. Now, using a colored nail polish, paint geometric shapes on the nails as seen. Apply another coat and dry again before putting a few drops of black polish onto the paper piece. Add some acetone and with the help of your brush, dip it in black paint to make outlines on the border of the geometric shapes. Then, layer with top coat to seal the art.

Image Credit: beautylish
6. Negative Space Heart Nail Art
Negative space nails with hearts is just the nail design that you need to pep yourself up. Begin by painting a base coat and dry your nails. In the meantime, cut out heart shapes and keep them ready. Now, paste these hearts on your nails that you desire, and then coat your hearts with a polish with two layers. After all the nails have been designed, peel off the hearts slowly one after the other using your tweezer. With the dotting tool you have, make an outline around the hearts. Apply a top coat as a finishing touch.

Image Credit: fabulousfacesstudio
7. Inspiring Maroon Negative Space Nail Art
This is a simple yet stunning piece of nail art where you have to polish your nails with any color that you like. Now dry the nails and then using the tip of your ear bud that has been dipped in acetone, make a triangle just like in the image. Dry it. The triangle has to be outlined with any color of your choice. Seal the design with a top coat.

Image Credit: nailsmag
8. Beaded Negative Space Nail Art
Start by painting the nails with different nail polishes in a curved manner as seen in the image. For this you have to dip the brush in black nail paint and make a border separating the painted nail with that of the nude portion. After making a few random strokes using different colors, let the nails dry. In the end, stick golden beads on the border, like in the image and seal the art with a top coat.

Image Credit: ytimg
9. Glossy Black Negative Space Nail Art
You can start by pasting stripes of tape horizontally on each nail. Thereafter, paint the nails with black nail polish. After the nails dry up, apply a top coat of glossy nude polish.

Image Credit: brijitsdigits
10. Modern Red Negative Space Nail Art
Start with pressing pyramid shaped stickers that resemble the letter V on each nail. Then, paint your base coat, leaving the taped portion on the nails. Dry and then layer two coats of red color on all the nails. Let the nail paint dry up a little and then peel off the stickers from the nails. Paint the top coat.

Image Credit: sev.h-cdn
11. Moon Negative Space Nail Design
Start painting your nails with a base coat of any color. Dry and then cut out moon shaped papers and press these on to the base of each nail. Once secured nicely, paint coral colored nail polish, two coats one after the other. For the accented border, use a golden glitter nail polish and add a top coat at the end.

Image Credit: popsugar-assets
12. New Year’s Eve Negative Space Nail Art
To get this fabulous New Year’s Eve negative space nail art, you have to paint the nails with a base coat polish. Then, using black and white polishes make a shape of V as shown in the image. For the thumb and index finger, use golden glitter nail polish. Now for the borders, use black and white polishes as seen in the image. For the middle finger, use black polish to make dots using a dotting tool. For each nail, use black, white and golden glitter polishes to make designs as seen. Apply a top coat.

Image Credit: nailitmag
13. Red and Silver Negative Space Nail Art
This design is stunning to look and you would start with painting your nails with a base coat. Dry and then apply red and silver polish to the nails as shown in the image. Dry a little. For the heart, you would need washi tape that has to be cut in the shape of a heart. Put the heart cut out on the nail and then press it tightly. Once secured, peel off the heart to reveal negative space. For the other nails, you can make use of a V shaped tape to fill it up with silver polish as seen. Apply a top coat.

Image Credit: parlordiary
14. Reverse Half Moon Negative Space Nail Design
Paint the nails with a base coat. Dry and then press tapes cut out in the shape of moon. Now, using maroon colored nail paint, polish your nails in the way as shown in the image. Dry and then paint the top coat for a glossy finish.

Image Credit: womenfashion
15. Amazing Floral Negative Space Nail Design
Floral designs such as this one can be achieved by painting your nails with a base coat. After the nails have dried, layer your middle finger, thumb and pinky fingers with white nail paint. For the ring fingers and index, you would need to outline them with blue polish. Once dry, make two lines diagonally inside the blue outlines. Then make a center line as seen. Using a nail art brush, make flowers using grey and black paints. Apply a top coat once nails have dried up completely.

Image Credit: nailitmag
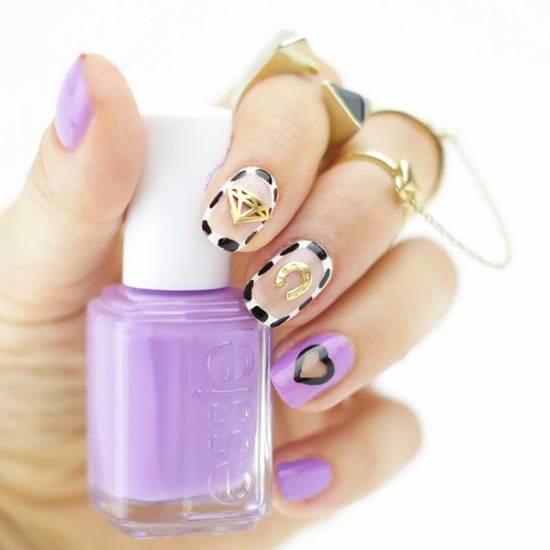
16. Radiant Orchid Negative Space Nail Design
This is an astonishing black and white design for which you will need nail jewelry or charms. You can use nail stickers from Hex Jewelry. For the fingers, you would need white, black and purple nail paints. Make a white outline on the forefinger and middle finger. Once dry, make black shapes on the outlines using a brush. Dry. For the ring finger, cut out a heart tape and press it against the nail. Then, paint the nail with purple polish. Once dry, peel off the heart tape to reveal the blank space. Gloss it up with a top coat.
Image Credit: nailthataccent
17. Cool Metallic and Neon Negative Space Nail Design
Take a washi tape and make thin strips. Now, press these tapes horizontally on the two nails as shown below. Coat the nails with silver, green and gold polish part by part. Dry and peel off the tapes. Coat the nails with a top coat.

Image Credit: parlordiary
18. Glitter and Geometric Negative Space Nail Design
This is a charming nail design for which you would need shapes that are cut out from washi tape. Press these as shown to make various designs. Paint over these tapes and once dry, peel off. Now paste black stripping tape on the nails as shown to make geometric shapes. Then, apply a top coat of matt finish polish.

Image Credit: parlordiary
How did you like the above showcased negative space nail tutorials? I think you would have fallen in love with these nail tutorials as these are attractive and very charming to look. Most of these tutorials are so simple that you can do these easily at home using items that are readily available at your disposal. So, take help from this post and choose that one special design to look like a diva!
 |
 |
 |
 |

About Rose Walker
Rose Walker has worked as a nail artist for over 10 years. She's gained a lot of experience and developed her own unique style during that time. When she was working at a famous nail salon, she met Shirlyn. The two of them quickly became friends, and eventually decided to start their own website together. Naildesignideaz is the result of their collaboration - it's a website where they share their experience and offer tips on how to create beautiful nails.
|
|
|
|

Popular Posts