Go for acrylic nails if you want to be more expressive when designing them. Acrylic nails are basically artificial nails that can be adorned with amazing designs to add a glam look to your personality. Acrylic nail designs that we have presented below are quite simple to be done, while, a few are definitely for the pros. The 20 nail tutorials shown below are creative and must be tried.
1. Acrylic nail design with white roses

For this amazingly pretty acrylic nails, you have to start with preparing the nails and then apply white gel base coat. Take a blob or a bead of white acrylic polish and place it over the nail. Now, press down the bead with the brush’s belly to create the rose petal. Create a layered look with the brush. Finish the rose petals by following the same steps. Cover the nails with roses and dry. This is one of the prettiest nail tutorials you will ever see!
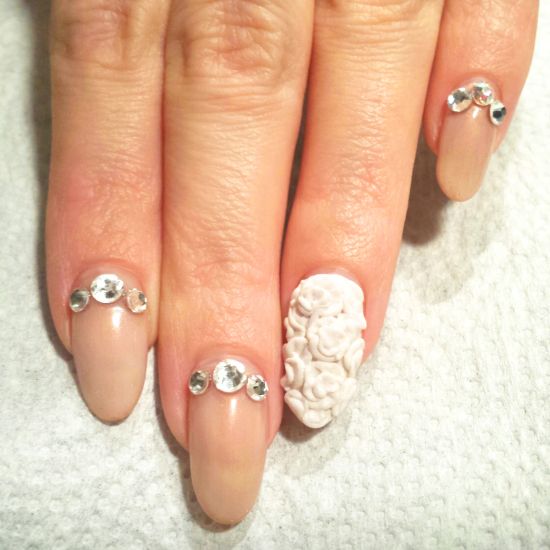
Image Credit: nailpro
2. Sparkling acrylic nail art
After priming your nails, paint a thin layer of base gel over them. Apply the fake nail form to create a squarish look. Using titanium gel and a brush, paint the base of the fake nails. Clip off the part that is not needed and then using pink gel, paint the nail bed and wipe to create a smooth look. Using sparkly gel polish, paint the tips. File the edges and brush off the dust. Paint the nails with Top Seal Light gel. Voila, you have got the perfect acrylic nails!
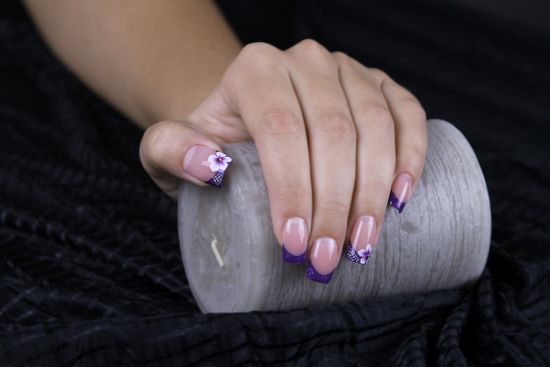
Image Credit: nailartsdesign
3. Retro floral acrylic nail art
Acrylic nail designs with flowers look stunning as the one shown below. After painting the nails with black, draw a white line across one of the nails. Using black acrylic nail polish, make two strips over the white line. Dry. Now for the flowers, take a foil and place two white beads, and spread them with the belly of the brush. Make another petal over it the same way. Create three layers of petals in white except for the middle that has to be made in black acrylic nail polish. Paste silver beads on the nails and seal with a top coat.
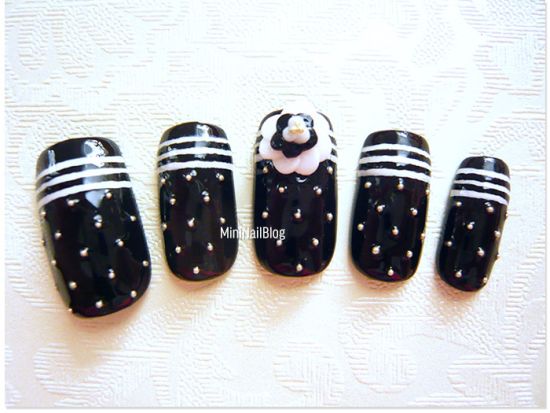
Image Credit: nailbees
4. Tiger strips acrylic nail tutorial
Start with pushing back your nail cuticles and clean any dead skin. Apply a nail dehydrator and prime your nails using a primer. Now, fix the fake nail design on your nail and apply a white bead of acrylic over the nail strips. Now spread it evenly. Then paint the nail bed using a clear acrylic polish. After you are done, clip off the fake nail that is not needed and file it. Once you have the tips ready, paint them to make strips as seen. Seal with a top coat.
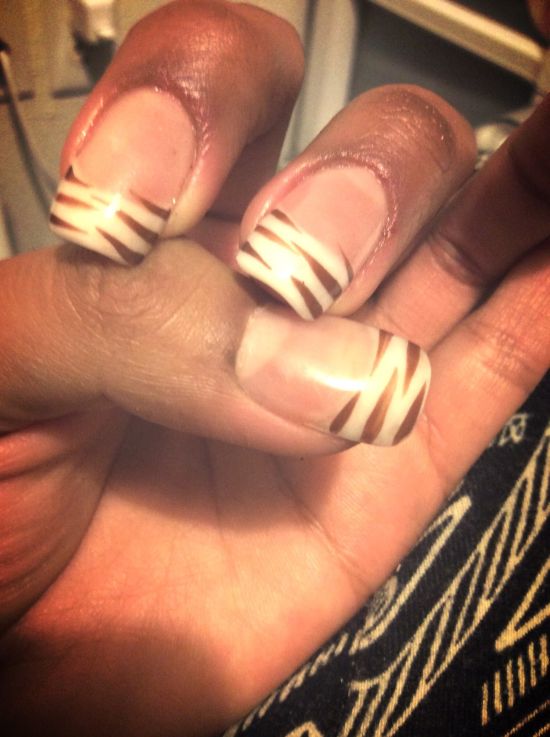
Image Credit: ytimg
5. Pink shimmering bow acrylic nail art
Start by filing your nails, and apply an acid free primer on them. Paint a base coat of nude on all nails. Use a fine brush and glitter polish to make two diagonal lines as shown. Dry and then paint the two portions with pink. After the pink has dried, take a nail brush and black acrylic polish to draw the bows, a few towards the tips of the nails, while others, just at the base of the tip in a straight manner. Fill the inner parts with white gel polish and seal with a top coat.

Image Credit: nailartsdesign
6. Glitter gel acrylic nails
After shaping your nails pointedly, paint a coat of pink acrylic nail polish over them. Dry and then apply glittery white acrylic paint on the tips. For the middle and index fingernail, paint with pink glitter acrylic polish all over and let them dry. Wait for sometime and then using a brush, dust off the powdery remains. You have got yourself a very easy and stylish acrylic nails!

Image Credit: ytimg
7. Gorgeous blue flower acrylic nail tutorial
After cleaning and priming the nails, go ahead with applying the nail forms on them. File them and cut as per the shape you want. Place a bead of clear acrylic paint and over it, press down the floral stickers as seen. Now make an aqua stem line using a dotting tool. For removing extra particles, use a buffer block, and then seal with a top coat of clear polish.
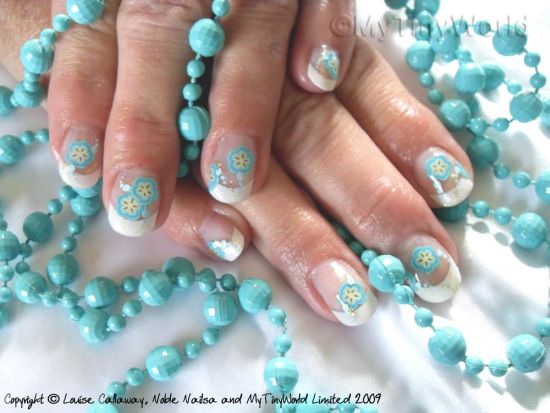
Image Credit: mytinyworld
8. Gray acrylic nail art tutorial
This is one of the simplest nail tutorials in this list of amazing acrylic nails and can be done at home. Paint a base coat of clear polish that strengthens the nails and dry. On a dish, place a blob of grey acrylic and white and mix them. After getting your desired shape, start applying it on all your nails. Seal with a top clear polish. Dry and then wash off the extra paint to have a clear design. Gel acrylic nails in grey and white tones look very classy and can be worn for office too.
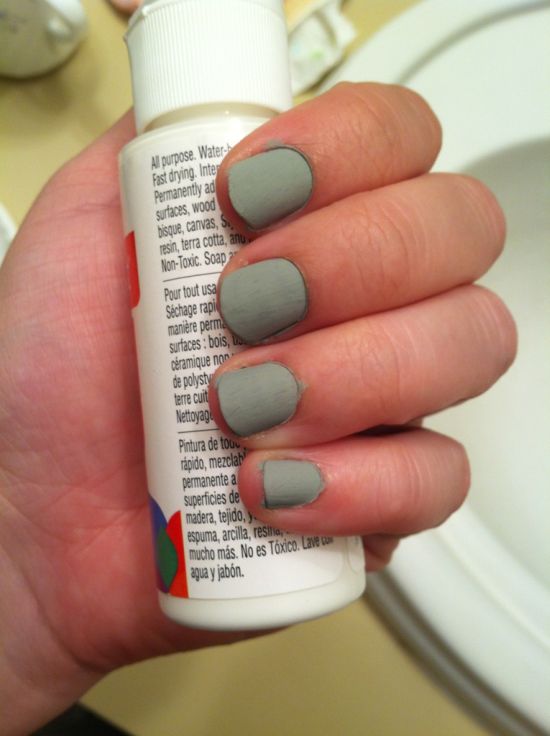
Image Credit: wordpress
9. Glittery blue polka dots acrylic nails
Start by painting your nails with two to three coats of China Glaze Blue and then dry. Now, start making the bow designs using light tone of blue polish. Let the nails dry and then using white acrylic nail polish, start making polka dots as seen inside the bows. Outline the border of the bows using black paint and seal with a top coat. Acrylic nail designs with polka dots and glaze always have a rocking effect on everyone! A must try!
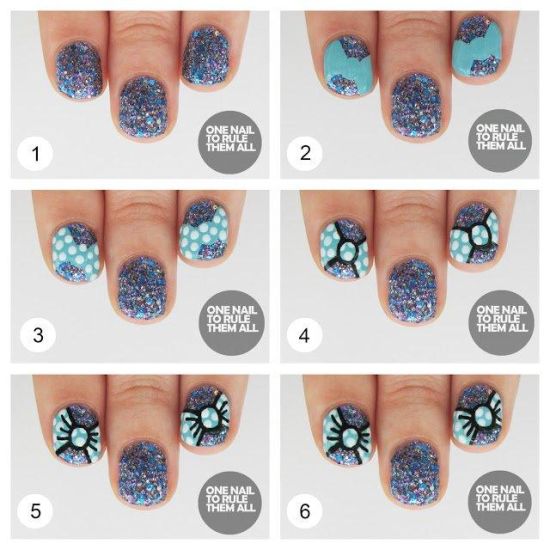
Image Credit: newnaildesign
10. Reverse acrylic nails tutorial
Reverse acrylic nail designs such as the one shown below are easy to be done by anyone provided you have all the things needed for doing such acrylic nails. First of all apply the nail tip over your nail. After this, do the clipping to achieve the required length. Take a blob of acrylic paint and place it over the nail form, spreading it evenly all over. Now, press down the form over the nail and after a few moments, take off the form. You will get a shimmering nail underneath. Shape the nail and seal with a top coat. Such gel acrylic nails can always be done at a short notice.
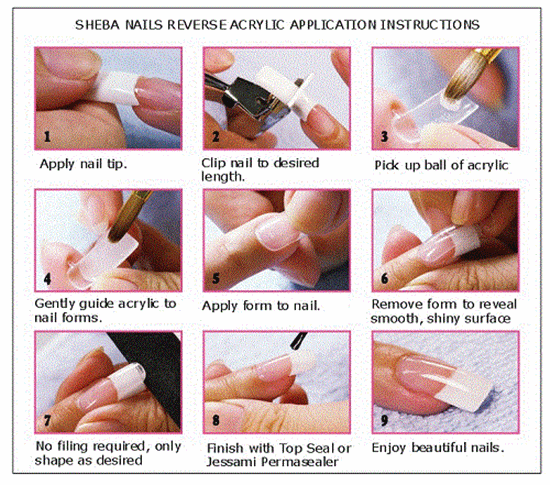
Image Credit: inkyournail
11. Silver acrylic nail tutorial
After cleaning and priming nails, apply the nail forms and paint using silver acrylic. Dry and shape the nails to any length. Then paint another two coats of silver. Now, apply a concealer and put stickers or beads as you feel. Dry and seal the art using a top coat polish.
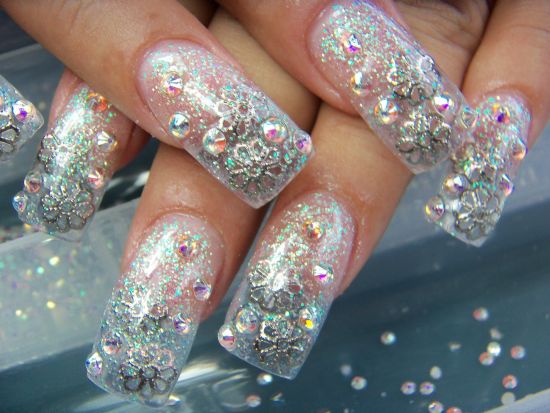
Image Credit: hauteaudio
12. Acrylic nail tutorial with pink gelux gel polish
Clean your nails by pushing away the cuticles and dead skin. Apply a primer and then apply the nail form or tip. Take a brush and pink acrylic to paint a coat over the nails. Apply another coat and dry. The ring fingernails can be accented using a golden or silver acrylic glitter in the same way as the others. Apply a serum gel all over the nails and stick the jewels on the accented nails. Seal with a top coat.
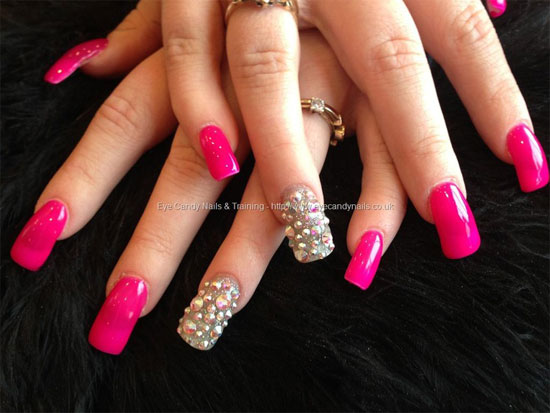
Image Credit: girlshue
13. Mermaid acrylic nail tutorial
Apply a base coat of green nail paint and dry the nails. Now, for the scaly designs, mix a drop of water and white acrylic polish and start drawing the scales on the nail cuticle as seen. The shape of the scale will be U. Make one complete row of scale designs. Top it up with another three or four layers. Seal the design with a top coat polish and you are good to flaunt this amazing acrylic nail art.

Image Credit: violetlebeaux
14. Pink glittery floral acrylic nail tutorial
Prime the nail bed and then apply the acrylic nail tips. Now, on the outward edge of the nails, on the smiling line, place a bead of clear acrylic polish and neon pink glitter. Mix it to spread the color. Now place a bead of clear acrylic paint on the spot where you want the floral stickers to be pasted. After pasting, polish over with a shiner. Seal with a clear coat polish.
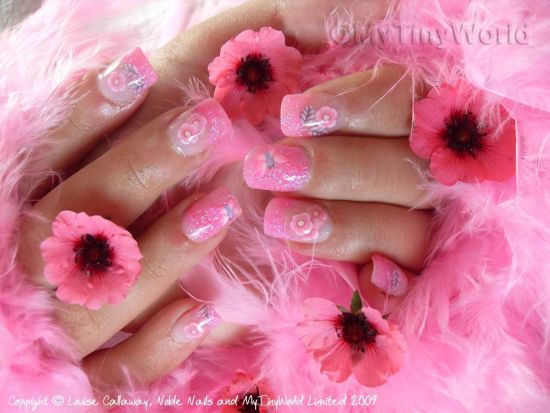
Image Credit: mytinyworld
15. Funky acrylic nail tutorial
For this trendy nail art, paint your nails with a base coat of shimmering pink and dry. Apply a primer and then paste the nail form over the nails. Paint a clear coat polish or glue and stick stickers of your liking to create a glam look. Seal the art with a top coat. Or if you want, you can use a number of acrylic paints to draw deigns on the fake nails.

Image Credit: healthywomenx
16. Blue floral acrylic nail tutorial
Paint a base coat of light pink or glittery white or nude gel polish over the fake nails. While still sticky, paste down your floral stickers as shown. Apply clear gel polish all over again. Stick beads or glittery blobs under the floral patterns. Paste a leaf design if you want it. Apply a cure over the nails and dry. Seal with a top clear coat to seal the design.
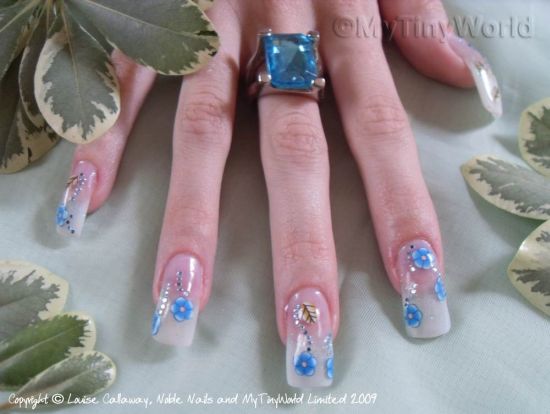
Image Credit: mytinyworld
17. Pink acrylic nail tutorial with polka dots
Prime your nails and then apply the nail tip or form. Apply a base coat of nude polish and dry. Take a bead of pink acrylic on the nail and spread it all over the tips. Dry. Now, take a clipper and shape the nails as you desire. Using black polish and a dotting tool, make polka dots on the pink tips. For the heart design, use a brush and black polish and line it up with glitter. Seal with a top coat.

Image Credit: girlshue
18. Cute acrylic nail tutorial with pink bows
Apply the nail form or tip to the nails after priming them. Apply a base coat of shimmering polish and dry. File the nails and clip to get the desired shape. Take a bead of white acrylic and spread evenly all over the nails. Dry. Place a small bead of pink acrylic at the spot you desire and press it down with the belly of the brush to create a bow shape. Place a bead or stud in the middle of the bows. Seal with a top coat.
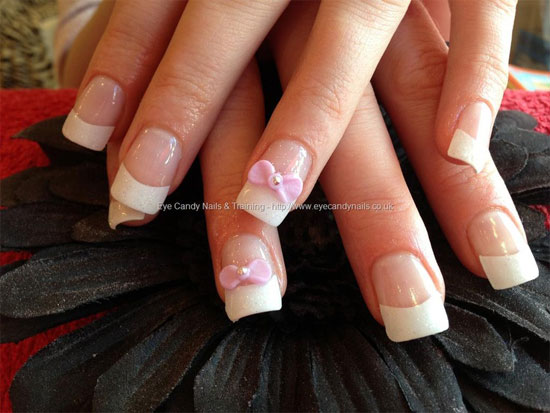
Image Credit: girlshue
19. Coastal themed acrylic nail tutorial
Begin by priming the nails and applying the nail forms. Now, apply Magenta light pink acrylic paint over the nails. Shape it in a squarish way. Then paint Sol Coral Gem acrylic under the pink shade. The third layer will be formed by lilac sea sand acrylic paint followed by teal sea sand acrylic. Shape the nails to any length you wish and encapsulate using clear acrylic. Apply gel concealer and then make 3D acrylic shells.
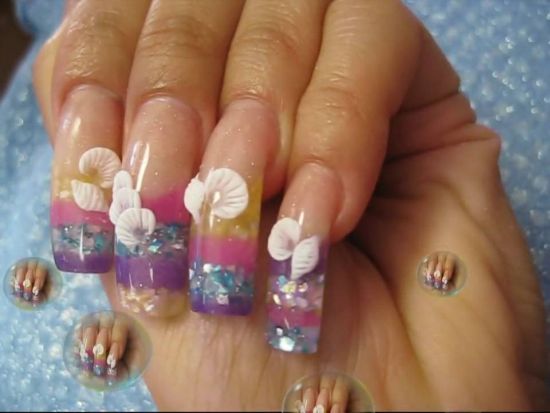
Image Credit: hauteaudio
20. Black glittery acrylic nail tutorials
Begin this beautiful nail art by painting a glittery line diagonally over the nail form. Do it in a way that it looks a little untidy as seen. Now, add more thicker glittery particles, followed by red shimmer below the golden glittery line. Using black acrylic polish, paint the top portion of the nail form completely and then paint red and golden shimmer in a way as shown in step number 5 here. Apply a top coat. Fix the acrylic nail to your nail bed and file them up to get the squarish look.

Image Credit: inkyournail
Enhancing your original nails beauty now seems to be easy with these gorgeous gel acrylic nails. These nails lend you a classy look and can be worn for daily use too. Though, some of you would feel that these nail designs are difficult to be done and require lots of maintenance, but the matter of the fact is that these nail arts are very simple and need practice. For achieving an ‘acrylic’ look, get yourself an acrylic kit consisting of acrylic nail polish of different shades, primer, resin and monomer. If you think you have fallen in love with these cool acrylic nails, do try these and ping back!
 |
 |
 |
 |

About Shirlyn Ramos
Shirlyn Ramos has worked as a manager for a famous nail salon chain for over 10 years. She's seen it all, and now she likes to share her experience with others in the hopes of helping them create beautiful nails. When she's not busy with work, Shirlyn enjoys spending time with her family and friends. She loves going on walks and exploring new places.
 |
 |
 |
 |
Popular Posts