We are presenting winter nail art that are pretty simple and are perfect for all our dear ladies who always want to look fashionable and are looking for nail art trends to be followed for beautifying themselves. Since, winter season is in full force, we thought it would be a great idea to showcase cool winter nail art tutorials to bring some fun to this cold season. All these tutorials that can be done easily by everyone. The below mentioned nail art tutorials are stunning and have been explained well. So, take a look!
1. Easy red and white polka dot Christmas nail art
Start by painting your nails with any clear base polish and let the nails dry up. Then, start painting nails alternatively using red and white. Let the paint dry and wait for a few minutes. Using a dotting tool or a toothpick, make polka dots using white and red shades as shown in the picture of winter nails below. Dry and then apply a top coat of transparent polish to retain the shine.

Image Credit: tblook
2. Easy blue winter nail art with snowflakes
Clean your nail cuticles well and wash them with mild soapy solution. Apply glycerin and keep it overnight to make your nails soft. Then, paint a base coat and let the nails dry. Afterwards, paint a coat of blue or teal all over the nails and let them dry. Use a fine brush and white polish to make the pattern of a snowflake by drawing three lines, starting from one corner of the nail. Add leafy designs like in the picture of winter nail art shown below.

Image Credit: pinimg
3. Easy silver and blue winter nails with snowflakes
For this awesome looking winter nails, you can choose any of the bright and deep winter nail colors like red, green, brown, maroon or deep blue. Any other shade of blue can also be used just like in the picture below where the nails are painted using blue polish. After applying blue, draw a x shaped pattern in the center of the nail followed by a plus design at the middle. Now, make leafy patterns to replicate a snowflake look. Seal with a top coat.

Image Credit: passionofashion
4. Easy lightening winter nail art tutorial
Start the winter nails by painting them with black. Dry and then, take a sponge and dab on electrifying colors like light blue, white and purple shades randomly all over. Dry the nails and wait for a few minutes. Now, take a dotting tool or a nail art pen that is equipped with a micro tip, and draw patterns of white to indicate lightening. Use white polish for this. Apply a top coat to seal the design.

Image Credit: cutediyprojects
5. Easy winter Santa Hat nails
Apply a nude base coat polish. Dry. Now, paint using light pink on all nails. For the hat of Santa, use red and paint it all over the nail tips as seen. Use a stripper brush and black polish to make the shape of the hat. Using red, fill up the inner spot of the hat as shown. Use white to draw Santa’s front hair trim and the same has to be done to make the pom pom below. Paint some sparkly polish all over the trim and pom pom and dry. Voila…you have one of the most easiest and stunning winter nail art designs right before your eyes!

Image Credit: cdninstagram
6. Simple snowflake winter nails
Winter nail colors like light blue, teal, red and white can all be used for achieving this cool nail art with an accented snowflake nail. Use a mint polish to paint on all nails. Leave the ring finger for the snowflake design. Paint the ring finger nail with glittery polish and then using a dotting tool or pen, make snowflake designs with white. Add a top coat. Winter nail art designs with snowflakes look amazing and are easy to do.

Image Credit: onsugar
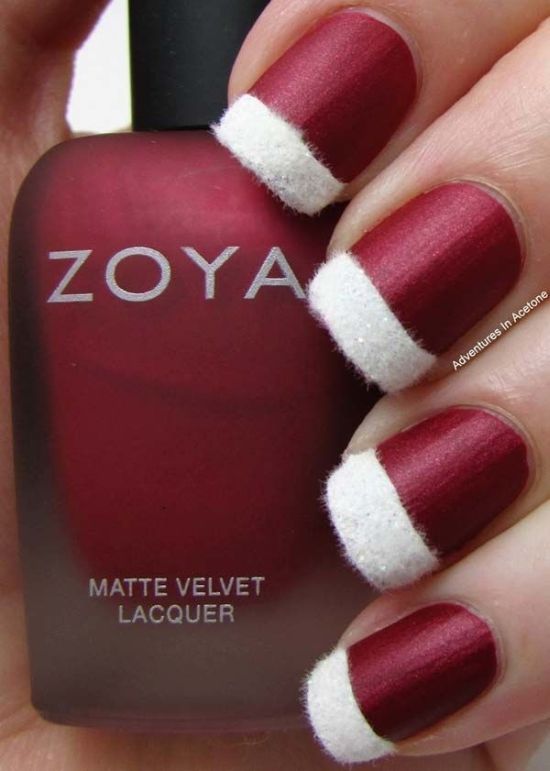
7. Easy velvety red winter nail art
Nail art tutorials for winter usually involve the use of various shades of red and maroon just like the image shown below where the nails are painted using matt velvet red lacquer polish. Start with a base coat and then paint velvet matt all over. Now, use white polish to paint the tips of the nails. While the polish is still wet, use a tweezer to stick cotton bits over them to create a snowy effect. Seal with a top coat.
Image Credit: fenzyme
8. Easy red winter nail art with stones
Who ever said that for winters, you can only choose between dark and deep shades? I guess, for this easy winter nail art, you can simply pick red polish and any other pastel like peach or light cream. Cream is also one of the prettiest winter nail colors and can accentuate the brightness of red like no other shade. Start by painting red on all nails except ring finger and middle finger nails that have to be polished with peach/ cream. On the ring nail, apply another coat and stick shiny stones to create an accented look.

Image Credit: fenzyme
9. Easy winter nail art with penguin
You can start by applying a base coat of light blue on all nails. Next, make the U shaped outer body of the penguin with the help of opaque black paint. Do it in such a way so as to leave a little background visible. Use white and a dotting tool to create the eyes and tummy. Make the eyeballs using black, while, for the beak and feet, make use of orange by any brand. For lending a wintry look, make use of a toothpick to create small bubbles or dots on all the other nails.

Image Credit: onsugar
10. Easy and gorgeous shimmery blue winter nail art
Firstly, paint your nails using light blue polish by any brand. Let the nails dry. Paint another coat of blue. Dry the nails. Wait for a few minutes. Now, apply a transparent polish all over the nails and while these are still wet, paint a deeper tone of blue shimmer dust using a brush. Seal with a top coat to retain the texture and the design.

Image Credit: stylemotivation
11. Easy frosty winter nail art
Firstly, mix two shades of blue or aqua and white together and paint all over the nails to create a frosty look. Apply a base coat and dry. Use a shimmer polish or glitter dust to spray all over the nails. Dry and now, stick tree stickers that you have bought from the store. Paint the trunk using brown and apply a top coat to seal the nail art.

Image Credit: popsugar-assets
12. Easy glittery winter nail art with neon colors
Paint your nails with white and once dry, polish with a shimmery paint. Now, using a nail pen or brush and black, draw a tree branch as seen. Use a brush and make bird designs using freehand. You can use neon shades like blue, orange, green and yellow. Seal with a top coat to retain the design.

Image Credit: blogspot
13. Easy black winter snowflake nail art
Start by applying a base coat polish. Now, use black on thumb, pinky and middle finger. For the index and ring finger, paint using white. While the polish is wet, stick snowflake glitters as seen. Dry, and then stick masking tape on the index nail and paint the base with black shade. Take off the tape and stick golden balls to make the bow design. Seal with a top coat.

Image Credit: small-good-things
14. Easy red and white striped winter nail tutorial
Apply a base coat polish and let the nails dry. Now, using white paint, polish your nails and leave them to dry up. For the striped look, stick tape bits horizontally on the white nails and paint all over with bright red polish. Once the nails dry, take off the tapes to reveal the red and white striped nail art. This winter, try out this super easy to do winter nail art.

Image Credit: beesdiy
15. Easy golden metallic and minty winter nail art
As the first step, paint your nails with a base coat. Dry and then paint using mint shade as seen. Once dry, take a dotting tool and draw balls or dots with golden metallic polish. Start making these balls in vertical rows as shown below and cover the nails. Seal the nail art with a top coat of transparent polish. This nail art makes use of mint and gold that are counted among the most vibrant winter nail colors of this season.

Image Credit: nailartsdesign
16. Easy winter nail art with white dots
Winter nail art designs with blue and white always look cute and just manage to wash off your winter blues. The nail art shown here is pretty simple as you need to paint your nails with a deep shade of blue. After the nails dry up, take a dotting tool or toothpick and make random dots of varying shapes all over the nails, using white. Make the base more dense with white dots and seal with a top coat.

Image Credit: girlshue
17. Easy plaid nail art tutorial for winter
Start by painting two coats of red and green on all nails alternately. For the red nails, use a darker tone of red to make two horizontal lines. Make use of a brush for this. Now, over the horizontal lines, draw one vertical strip as seen. For the black squarish patterns just at the meeting points of these lines, use black shade and nail art brush to draw them. Draw sleek whitish lines as seen. Dry and then make black lines. Now, Seal with a top coat.

Image Credit: sonailicious
18. Easy Christmas winter nail art
Winter nail art designs with blue and white look very cute and glam too. For this cold Christmas, you can go in for this amazing looking blue nail art as its simple to be done. Begin by painting your nails with a base coat of blue. Dry the color. Now, with the help of a brush and white paint, polish the tips of all nails, except the thumb whose corner has to be painted with white. Using a dotting tool and white polish, draw small dots all over. Take the help of a bigger brush and make snowman designs like in the image. Draw a big circle with white on the thumb and fill it up.

Image Credit: fashionbat
19. Easy floral winter nail art
Winter nail art can also have floral patterns and designs if you are into flowers and like beautiful artistic motifs of roses or lilies drawn onto your nails. Nail art tutorials such as this one are easy to be done without any professional’s help. Start by painting nails with black. Using a nail art brush, make white floral patterns like below. Then, make small dots using yellow and seal with a top coat.

Image Credit: netdna-ssl
20. Easy winter framed glitter nail art
Like this winter nail art? If yes, start asap by painting nails with a base coat of white. Dry and then paint another coat. For the framed look, draw the outline of each frame using a fine brush and sparkly blue. Let the color dry up and then using the brush, fill the inside of the frames withe same glittery polish. Seal the design with a top coat.

Image Credit: blogspot
With these awesome nail art tutorials, we are sure your winter will no longer look dull and bland. Try a few of these 20 winter nail art designs and tutorials shown above and light up any occasion!
 |
 |
 |
 |

About Shirlyn Ramos
Shirlyn Ramos has worked as a manager for a famous nail salon chain for over 10 years. She's seen it all, and now she likes to share her experience with others in the hopes of helping them create beautiful nails. When she's not busy with work, Shirlyn enjoys spending time with her family and friends. She loves going on walks and exploring new places.
|
|
|
|

Popular Posts