Valentine nail art as showcased in today’s post will cover the top 20 amazing and inspiring nail art tutorials specially brought before my gals who would want to adorn their nails with these beautiful Valentine nails. Valentine’s Day will be celebrated with much fervor on Feb 14 all over the planet and will see an entourage of women sporting cute and sexy Valentine nail art. Look at the following nail art tutorials and get inspired:
1. DIY Valentine’s Day nail art tutorial
First of all, clean your nails before layering them with a pink shade at the base of each nail. Now, paint the right sides with coral nail polish, and then the left sides. Paint in such a way that the shape of a heart is created as seen in the image. Once dry, repeat the process with a deep red shade. Once done, let the nails dry and then layer them with a top coat to seal the design.

Image credit: popsugar
2. Cupcakes Valentines nail art tutorial
To get this awesome nail art, you would firstly layer your nails with a thick coat of skin nail paint. Once dry, apply light pink shade on the tips of the nails or above the moon. Let them dry. Now, with a fine brush, make vertical strips on the pink painted tips. For the white part of the cupcake, take your brush or any other appropriate tool to make the design as shown, starting just a little below the moon. Dry. Then, take another brush and make small pink dots over the cupcake. For the heart, draw with a red nail paint. You are done!

Image credit: fabartdiy
3. DIY Cats in Love Nail Design
DIY nails as these are perfect for Valentines Day. Begin by painting your nails with a base coat of transparent nail polish. Once dry, take a bottle of light pink polish and apply it on the moon of your nails. Now, dip the brush in black paint and make a small dot as seen below. Complete the body of the cat by making another circle, touching the moon of the nails. Draw the tail of the cat in black using a fine brush. Do the steps again to create a white cat. For the other nails, create paw marks in black and white, just like in the picture below.

Image credit: youtube
4. Beautiful roses Valentine nail designs
This is an elegant nail art where you can paint any shade as the top coat. Then, take a bottle of semi light pink paint and draw blotches as seen. Thereafter, add curves resembling the inner folds of a rose petal, in shades of white and darker pink. Now, dry the nails and then apply a top coat to add shine.

Image credit: fabartdiy
5. Splatter Valentines nail art
First, apply a base coat on the nails, after which, spread out a piece of paper on a table and then put a blob of another nail shade over it. Then, apply the paper directly on your nails, one after the other. This will create awesome looking splatter nails.

Image credit: srtrends
6. Pretty pink Valentine nails
For getting this mauve pinkish Valentine Day nails, you would need just simple shades of pink and white. Start by applying a base coat. Then, paint your nails with pink nail polish. Dry, and then make the designs using a fine brush, using white nail polish. If you wish, apply a top coat to retain the shimmer.

Image credit: allforfashiondesign
7. Beautiful pink Valentine’s Day nail art tutorial
Start by layering your nails with a top coat of pink color. Once dry, with the help of a brush, make hearts of varying sizes and colors. For the messages, take a bowl of alcohol and dip the message strips that you bought into it. Now, take the strips out one after the other, and pin these down in the middle of each heart. Cut out the edges of the paper.

Image credit: mtv
8. Bow Valentines Nails DIY
Want some spice to heat up this Valentines day? Well, follow this Valentine nail art as its super easy! Select any shades as you like. First, paint your nails in red color. Dry,then follow it up with pink shade on top of the nails. Let the nails dry, then, using a fine brush dipped in black, make a line just at the spot where the other two shades merge. Next, you have to draw bows as seen in the image.

Image credit: gleamitup
9. Valentine’s Day heart nail tutorial
File your nails. Now, paint nails with a transparent base coat. Dry. Take your regular tape and cut out thin sized strips. Put these strips on your nails as shown. For the tips, paint them in the shade as shown. After the tips of your nails are done, you can then proceed to make the hearts. Dry. Afterwards, pull off the strips and wait for the design to set completely. Apply a top coat to seal the art.

Image credit: myhijab
10. Sparkle hearts Valentine nails
Clean your nails and file them. Now, except for the ring fingers, paint all others with a base coat nail paint. Dry. For the middle fingers, thumb and index fingers, apply the color pink. Add glittery polish to the pinkies. Now repeat the whole process once again. Take a tape and make hearts out of it with the help of heart shaped hole punch. This tape should be placed on the ring fingers in such a way that the hearts lie at the center of the nails. Once the hearts are in place, apply pink shade twice over them. When almost half dry, pull off the tape. Once dry, paint a top coat.

Image credit: babble
11. Cute polka dots and heart Valentines nails
Quite easy to do at home, you would need a dotting tool, some nail paints in black, red and white. Begin by applying white coat over the nails. But, stop and leave the upper most tip of the nails for you to paint them in black. Once dry, take the dotting tool and dip it in black nail paint to make polka dots. Let the nails dry. Then, paint the tips using black. For the hearts, you can stick red shiny hearts and small stickers as seen in the image.
Image credit: allforfashiondesign
12. Cute cartoon heart Valentines Day nails
Paint your nails with a base coat color. Once dry, take your brush from your nail art kitty and make a heart using black paint. Go on making hearts on the tips of your nails. For the black heart, dip your brush in any dark color as you want and fill the insides. For making the hearts appear ‘cartoonish’, use a dotting tool to make dots as seen.

Image credit: allcrafts
13. Red heart Valentine nails
Begin this nail art by painting your nails with a base coat of either pink or red. Leave the ring fingers where you will draw a heart as shown. For this use a toothpick to make tiny dots at the bottom and in the center of the nail. Then, fill up the heart using red shade. You are done.

Image credit: instructables
14. Awesome birds and hearts Valentines nails
Apply a white base coat shade on all the nails. For the sky motif, blue colored strips have to be made and for the moon, green and yellow shades have to be painted. For the greenery, make grass with brush dipped in darker shade of green. For the flowers, use any dark color. If you wish, you can make two faces, just like in the image, using red and white nail paint.

Image credit: fabartdiy
15. Polka heart Valentine’s nail art
For getting these Valentine nails, you would need two shades of nail paints, one in red and the other in white. After filing the nails, apply a base coat of transparent shape, dry, then apply red paint on all the nails. Let the nails dry, then, take a dotting tool or a brush to make small hearts in white as seen in the image. Seal the design with a top coat.

Image credit: thestyleinsider
16. Amazing sailor nail art tutorial for Valentines Day
Paint your nails with red shade. Thereafter, make a V shaped tip in white. Repeat the same step using blue shade. Now, take a gold tape and apply on the base of the white v tip. Then, take three golden stripping tapes and apply them horizontally towards the lower part of the nails. Seal it with a top coat.

Image credit: nail-art-101
17. Gorgeous golden and red Valentine nail art
Apply base coat of nail paint and dry the nails. Now, paint nails with nude nail color. Dry. From the nail art stamping kit you have bought, take out the heart designs as seen in the image. Apply red color on most nails except the index finger which is to be painted using golden polish. For the diagonal strips, use a brush dipped in golden color. The half moon design on the middle finger nail is to be made using golden again. Once, the designs are finished, dry the nails and apply a top coat.

Image credit: feminspire
18. Easy heart Valentines nail art tutorial
Clean your nails before painting them with a base coat of light blue nail shade. Dry. Now, use a fine brush and draw outlines of hearts on each nail, just bang in the middle of each one. Let the hearts dry up. Take the brush and dip it in pink or red nail polish bottle to make an abstract pattern or art inside the hearts as seen in the image.

Image credit: abeparty
19. Valentine owl nail art tutorial
For drawing the owl nail art, you would need a stripper brush to make the tiny legs of the birds, then, draw a circle each on top of the two legs. For this you would need a nail art brush. Make ears too with this brush. With the help of a dotting tool, make the eyes in yellow. Dry. Then make inner eyeballs using black. Beaks are to be drawn using yellow shade, with a dotting tool. On the belly of the owls, make hearts using a dotting tool and wings are to be made next. For the other nails, draw branches in brown, and hearts in red.

Image credit: pinterest
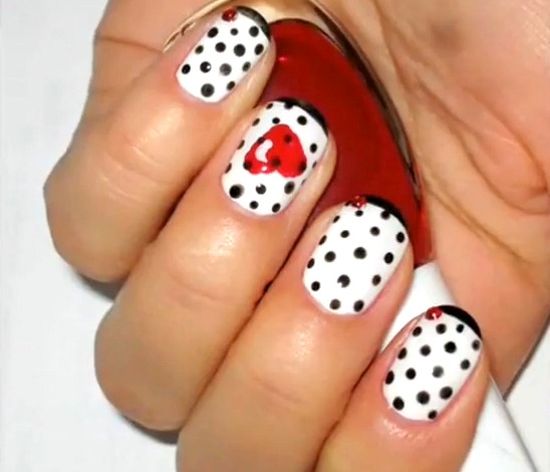
20. Valentine nail art designs with heart and polka dots
This is a very simple yet pleasing looking nail art where you would start by applying a coat of white nail shade as the base coat. Dry, then, with the help of a dotting tool, make tiny dots as seen in the image, using black nail polish. For the sweet pink hearts, use black shade for the outlines, and pink for filling the interiors. Voila… you are done!

Image credit: nailideasite
The above mentioned nail tutorials will not just spice up the oomph factor when you are out celebrating this festival of love, but will help you discover your newer selves. Valentines is a celebration of love and romance and one can try out any of these wonderful Valentines nail designs depending upon her budget and convenience. While, a few of the nail tutorials showcased above can be done easily using DIY techniques, for others, you would need extra accessories. Valentines nail designs add to the glamor, no doubt, but also make you look younger and vivacious! Go gals… make the most of this day!
 |
 |
 |
 |
Tags: , , , , , , , , , , , , , , , ,

About Shirlyn Ramos
Shirlyn Ramos has worked as a manager for a famous nail salon chain for over 10 years. She's seen it all, and now she likes to share her experience with others in the hopes of helping them create beautiful nails. When she's not busy with work, Shirlyn enjoys spending time with her family and friends. She loves going on walks and exploring new places.
|
|
|
|

Popular Posts