Planning to celebrate your birthday soon and are in a fix about how to dress up your nails? Read about these cool nail art tutorials and get ready to flaunt cute and gorgeous nail designs that will make your special day an event well remembered! Birthday nail art is all about using bright colors and designs to enliven the mood. These nails are easy to do. See below to pleasure your eyes!
1. Cute candle birthday nail art
Apply a nude coat on nails and then using different polishes like orange, light blue, white and light peach or cream, make candle shapes at the base of each nail. Take a nail art brush and black to make the candle wicks. Use orange and make the flames over the wicks and put a blob of yellow on top to create the flame effect. Apply a top coat.

Image Credit: istreetfashion
2. Brown cupcake birthday nail art
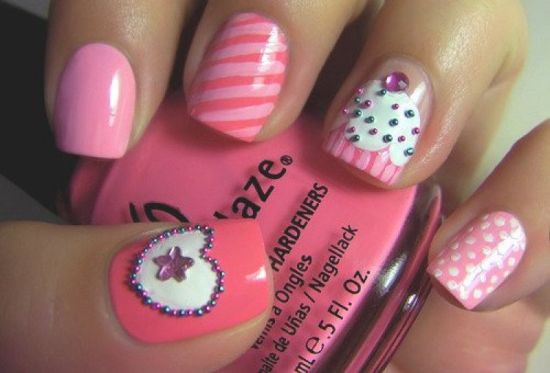
Paint golden shimmering polish all over the nails as base coat. Dry and then make the base of the cupcakes in light pink. Follow it up with a darker shade of pink strips. For the frosting, make use of brown and make polka dots in various shades. Then coat your nails with clear polish and stick a heart shaped stone or glitter on top. Seal with a top coat.

Image Credit: newnaildesign
3. Cute birthday balloon nail art
Apply a base coat all over the nails and paint white after drying up. Use bright red, green, blue and purple shades to be painted on the moon of each nail using a brush. The moon has to be painted in a curvy manner as seen. To give the impression of a balloon, take a brush and make the ends using the same shade as you have applied inside the balloons. Draw the strings in black and dry. Seal with a top coat.

Image Credit: pinterest
4. Cute birthday party nail art
Birthday nail designs involving balloons look cute and are quite easy to be done. Paint nails with a base coat and then top it up with white. Take a brush and make balloons in different colors as you like. Use black to make the outlines and the strings of balloons. In order to enhance the party look, draw buntings and other patterns as you like randomly. Coat the ring fingernail with glitter and sparkle of all shapes. Apply a top coat and seal the nail art.

Image Credit: youtube
5. Cute birthday nail art in pink
Paint all nails in different shades of pink and dry. Take a nail art brush and start to make the designs of a birthday cake, girl’s accessories, nail polish bottle, the silhouette of a girl and a cupcake in black. Add glitter on some nails and rhinestones on the hair of the girl to accentuate the party look. Seal with a top coat.

Image Credit: holidayhuntsville
6. Cute cupcake and glittery birthday nail art
For all nails, except pointer and ring fingers, use watermelon polish or watercolor, while for the other two, paint purple. Make the base for the cupcakes with pink polish while take some acrylic paint to make the frosting. Use Zoya Sooki, China Glaze Solar Power and Caribbean Blue to create sprinkles. Fill the frosted portion over the nails with strips of different cool colors. Seal with a top coat.

Image Credit: blogspot
7. Golden glitter and pink birthday nail art
After coating the nails with a base paint, polish pointer and pinky finger nails with golden glitter paint. Add two to three coats to create a chunky look. For the ring finger, paint the nail with white while for the middle and thumb finger, paint using pink. Dry and then, with the help of a fine brush and some black polish, draw the number 18 on the thumb. On the ring finger, make blobs of balloons in pink and glitter, then add strings in black.

Image Credit: prettydesigns
8. Cute sparkle cake and candle birthday nail art
Nail tutorials such as this looks fabulous on young girls. Paint all the nails with shimmering maroon polish after base coating them. Take a brush and white polish to make half moon towards the tips of all nails. Fill these half moons and then draw designs of pink cakes. Add light pink frosting on top and follow it up with brown candles and orange flames. Paint a top coat.

Image Credit: fancy
9. Cute birthday cake nail art
Paint a base coat over the nails followed by a main coat of purple. Make sure you leave some space at the base and start painting, leaving a little gap. Dry and then, paint bluish purplish glitter polish on each nail. Take a brush and white polish to draw the base of the cake. Line the lower portion of the cake’s base with pink dotted pattern and also the top part. Make small heart shapes as seen and candles with blue. Add flames on top with yellow.

Image Credit: youtube
10. Cute birthday candles nail art
Paint the nails with different light polishes after you have base polished them. With the help of a brush and white polish, make the frosting on the tips. Use a toothpick to make small dots inside. Then, using a few matching colors, draw the candles on top of the frosted portion and add flames in yellow. Seal the nail design with a top coat.

Image Credit: wordpress
11. Cute bow and cupcake birthday nail art
Make the tip of any one of your nails French tipped with beige. Make the frosting for the cupcake with a nail dotting tool and fill it up with pink. Draw lines vertically using white to make the base, thereby adding small yellow and other such cool colored dots as sprinkles. Paint a coat of polish and stick a stone on top of the cupcake. For the bow, paint the lower part of the nail with purple and draw a dot on top, followed by triangles on both sides. Make a ribbon. Add a stone in the middle of the bow. Use white to outline the bow.

Image Credit: youtube
12. Cute candle and polka dots birthday nail art
Paint your pinky, middle finger nail and thumb with pink polish while use white for the remaining two. Take a brush and Edgy Pink shade to make the body of the candle and add orange flame on top. Use purple shade to make balloons and black to create strings. Make polka dots in shades of pink and purple. Seal with a top coat.

Image Credit: cokerschampagnetaste
13. Cute cupcake and heart birthday nail art
Paint all the nails in pink except the ring finger that has to be painted with clear polish. For the cupcake design, paint the lower part of the nail with pink and top it up with a white frosting. Draw vertical lines at the base of the cake and top the nail with a coat of polish. Stick a rhinestone on top and add small colorful beads or stone as sprinklers. For the heart shape, paint a coat of polish and stick rounded beads in the form of a heart. Take a brush and fill the inside with white. Stick a star shape in the middle.
Image Credit: naildesignsforyou
14. Cute birthday cupcake and candle nail art
Start with applying a base coat and then using pink, make the base of the cupcake. Take a brush and some white polish to make the topping. Draw strips with light pink and add a red stone over the topping. Paint other nails with dark pink. Now, using white make diagonal lines and paint the other half with light pink. For the index finger, make candles with variety of shades and for the flames, take a brush and some glitter to create the effect. This is one of the most popular nail art of all the listed nail tutorials.

Image Credit: istreetfashion
15. Bunting and cake birthday nail art
Paint a base coat of nude polish on all nails. For the thumb, use pink to paint a coat and add a cake slice in white with colorful sprinklers. For the rest of the nails, make the frosting of the cake in pink and outline it with white dots. Draw white lines near the base of the nails in a slanting pattern and make triangles to show buntings. Draw 2 and 7 in red or pink over the middle and ring fingernails to show candles and top it up with orange flames. For the pinky and pointer, just make the cake shapes and buntings.

Image Credit: blogspot
16. Cute glittery 24 birthday nail art with balloons
Paint pointer, ring and pinky nails with white, while for the other two, use yellow. On the pointer and the pinky, draw blobs of different colored balloons with strings painted in black. For the middle finger, take a brush and draw 2 using pinkish glittery polish, and blueish glitter to make 4. For the thumb and ring nail, draw a cupcake and a cake slice in any shape as you like.

Image Credit: fancy
17. Stylish cupcake birthday nail art
Paint a base coat of clear polish on all nails. Dry and then using a deep shaded polish like purple, make the base of cupcakes as seen. Once the nails have dried, take a brush and white polish to draw the frosting on top. Add sprinkles all over the frosting with a red cherry design on top. Seal with a top clear coat.

Image Credit: prettydesigns
18. Cute golden and black cake birthday nail art
After base coating your nails with clear polish, paint them with wet n wild black polish. Take a brush and golden glittery color to make the candle stands on three nails as seen. Paint the base of the cake with golden metallic, leaving the edges in black. Add the frosting too in the same color, followed by design loops on the body of the cake in black. Use orange to make candles. Paint a top coat of glitter and stick raindrop shaped rhinestones and roundel ones on the candles and cake.

Image Credit: youtube
19. Cute blue and pink bunting birthday nail art
After you have base coated your nails with a clear polish, paint them with peppermint as seen. Use a brush and white polish to create a curvy design on the half moon of each nail. Take a nail art pen, blue and pink polish to make triangles of the bunting. Now, with white, make the outlines. Seal with a top coat.

Image Credit: eversojuliet
20. Confetti birthday nail art
Apply a base coat of white and peach on the nails as seen. For the one fingernail, paint it with glitter and add two to three coats. Dry and then, use a chunky glitter polish to coat the thumb and the pinky. Use a dotting tool, make dots in a number of cool shades as you like. Draw a vertical strip down the length of your middle finger nail in sparkling blue glitter polish. Add lines in peppermint and peach alongside. Seal with a top coat.

Image Credit: xovain
Celebrating your birthday with these cute birthday nail designs will definitely set the glamour quotient high. These nail art tutorials are a fun way to add some zing to the way your nails look on your special day. Go through these cute birthday nail art and ping back if you get enamored by a few! Happy nail painting gals!
 |
 |
 |
 |

About Shirlyn Ramos
Shirlyn Ramos has worked as a manager for a famous nail salon chain for over 10 years. She's seen it all, and now she likes to share her experience with others in the hopes of helping them create beautiful nails. When she's not busy with work, Shirlyn enjoys spending time with her family and friends. She loves going on walks and exploring new places.
|
|
|
|

Popular Posts