Negative space nail art has long since been a favorite amongst the nail art lovers. However, in the recent New York Fashion Week, nearly one-third of the nail designs seen were negative space designs. For negative space designs lovers this is a huge encouraging event. Negative space nail designs look gorgeous on your nails. They give off a unique aura, especially with the negative space giving off a unique twist to your otherwise regular designs. Recreating these designs is quite easy, especially if you are an expert with the nail art brush. However, if you are not that confident about using a nail brush flawlessly then you can always take help of the stripping tapes.
If you are in love with negative space nails and are finding it difficult to recreate them on your nails then follow our step by step easy nail tutorial.
1. Clean your nails
The first step for starting any nail art is to clean your nails thoroughly. This prevents the chemicals present in polish colors from damaging your nails. You should wash your hands with soap and dry them completely. Do your cuticles and ready your nails for this gorgeous nail design.

Image Credit: nailsmag
2. Gather raw material
The next step is to gather all the material you will require for recreating this negative space nail art. You will require a clear base coat, a glossy top coat, matte top coat, stripping tape, and opaque black and white nail polish colors.

Image Credit: blogspot
3. Apply clear base coat
Next, before starting to create the design, apply the clear base coat on your nails. Applying a base coat helps protect your nails from the chemicals in polish colors you are going to use.

Image Credit: theluxelife
4. Stick the stripping tape
The next step in this negative space nail design is to stick the stripping tape onto your nails in the graphic shapes as per the design. You will be putting up the tape to make it easier for you to paint the nails leaving the negative space polish free.

Image Credit: mixdajo
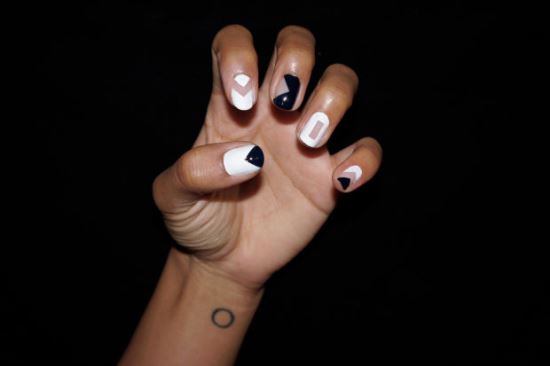
5. Paint them black and white
Now that you have the tapes ready you simply have to paint the nails with the black and white polish in order to recreate the same design. Make sure that you paint the nails in line with the stripping tapes so as not to smudge the negative space on your nails. You will be applying two coats of each polish to give it that perfect look. For these negative space nails, remember to do one nail at a time in order to avoid creating a mess. Once you are done, clean up your nails around the cuticles.

Image Credit: algemeiner
6. Top coating
Once you are done applying the polish, remove the stripping tapes carefully and let the polish dry completely. After the polish dries completely you apply the glossy top coat on all your fingers except for the middle finger. You will be applying the matte top coat on the middle finger.

Image Credit: mydresscode.gcampaner
We hope to have served the purpose of easing out your difficulties in recreating this negative space design with this step by step nail art tutorial.
Image Credit: xovain
 |
 |
 |
 |

About Shirlyn Ramos
Shirlyn Ramos has worked as a manager for a famous nail salon chain for over 10 years. She's seen it all, and now she likes to share her experience with others in the hopes of helping them create beautiful nails. When she's not busy with work, Shirlyn enjoys spending time with her family and friends. She loves going on walks and exploring new places.
|
|
|
|

Popular Posts