by Rose Walker
Nail art designs have evolved from simple to complex and women just love using them. Many prefer having long nails while some prefer the short nails, which according to many are difficult to deal with when it comes to creating beautiful nail art. However, that is not the case at all. In fact, you might be able to experiment more with your regular sized nails than the long ones and in just as many creative ways as with the long nails. We have here fabulous short nail designs along with their nail tutorials for you. So go ahead, sift through, and work towards making your regular sized nails look gorgeous.
1. Rainbow polka dot design
For this short nail art, you will need the different rainbow colors you want to paint on your nails along with thick and thin dotting tools for creating the polka dots. To create this design you need to paint all your nails with white as your base coat. Once the base coat dries, you create large polka dots with the color you want to start with at the bottom of your nail. Then you create smaller dots in between the gaps with the thin dotting tool. You repeat the same procedure with all the colors and on all your nails, and there you are with rainbow polka dot design on your short nails.
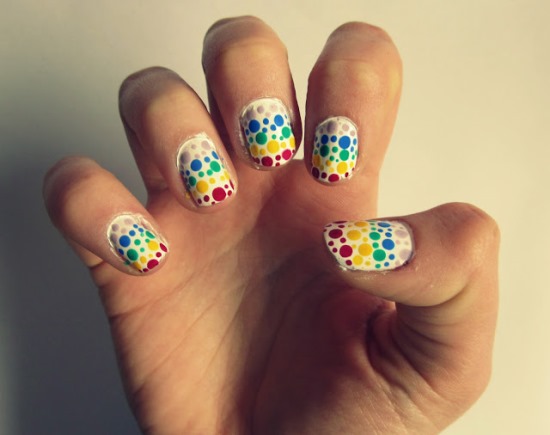
Image Credit: blogspot
2. Gorgeous Splatter Nail Art
To create this gorgeous splatter nail art on your nails, you first need to paint your nails with a light colored polish. Then comes the splatter part, where you’ll once again get to live out your childhood days! Using a make-up brush, dip it in the nail color you want to create splatters with. Before splattering it on your nails dip the brush quickly in a nail polish remover to make the paint thinner. Go on splattering the paint on your nails, but make sure you’re working on a covered surface or it’ll only increase your clean-up process. Repeat the process with other colors and you’re done, ready with gorgeous looking short nails. To lessen your clean-up process, you can tape up your fingers around the nails.
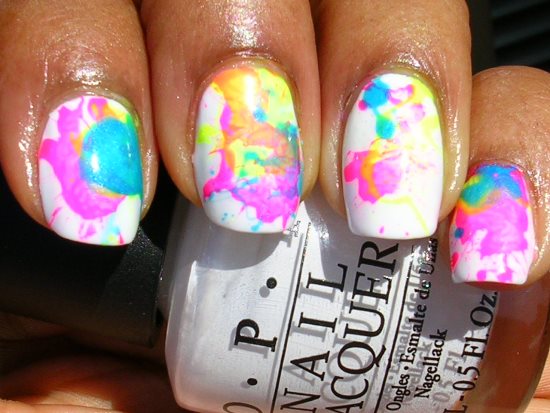
Image Credit: stylezilla
3. Monochrome Crescent Mani
This nail art tutorial is the easiest for your nails and probably unique too. The asymmetrical crescent is easy to reproduce and make your nails look attractive and gorgeous. Start by painting your nails with white as your base coat. Then using a dotting tool, create a black outline for the asymmetrical crescent shape. Once you’ve drawn the outline, fill in the space with black nail polish. Apply a top coat on the nails and you’re done with this short nail art.
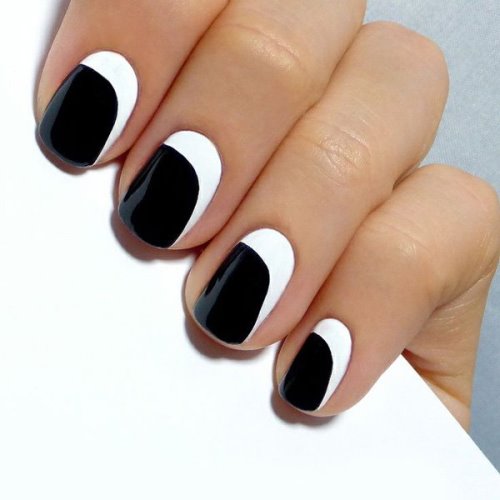
Image Credit: cuded
4. Herringbone Mani
This nail tutorial teaches you how to create the herringbone design on your nails. Start with applying a base polish of your choice at least an hour or the night before which will dry the polish completely. Then take the nail stripes from Sally Hansen Hard as French Manicure Kit and cutting them in long halves. You then cut the long halves into two, which will give you four stripes. You cut create two such sets for your nail. Now, paint the four stripes with any color you want. Once painted, you start placing them on your nails in the herringbone pattern. Once you’re done with the first set, start laying down the second set on your nails to complete the herringbone pattern. For a finishing touch, add a fast drying top coat and see an attractive herringbone effect on your nails.
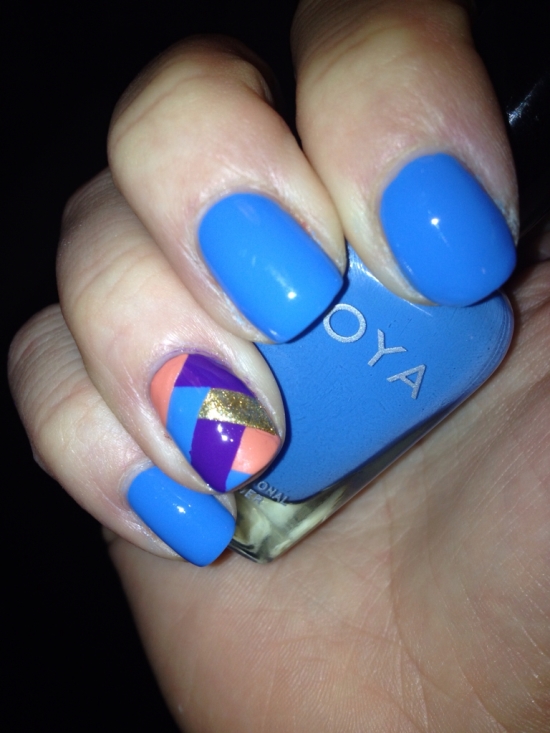
Image Credit: googleusercontent
5. Pink Gradient Mani
For short nails, this nail art is probably the easiest and quite an attractive one. You start with painting your thumbnail with a deep pink nail polish. You then make four puddles of the same polish on a plastic sheet, which will make your clean-up process easier. Next, you add a drop of white polish to the first puddle, two drops in the second, three in the third and four drops of white polish in the fourth puddle. Mix each of the puddles to achieve different shades of the color pink. Then apply each of those colors on your remaining four nails and apply a top coat. There you are with a beautiful pink gradient mani.

Image Credit: rougeframboise
6. Geometry and Roses Mani
To reproduce this short nail art on your nails you first need to paint your nail with white polish as a base coat and let it dry. Then, using a nail art brush dipped in pink polish, draw rough circles on three of your nails, leaving the thumbnail and the ring finger. You then dab white and a darker pink shade onto your roses using very little paint on your nail art brush. Using an olive green colored polish, you draw two or three leaves around the roses. Once done with the roses, you come to the geometric shape. Apply striping on the remaining two nails to create a trellis grid and paint the nail with olive green polish. Removing the stripes, you will have your geometry and roses mani ready.
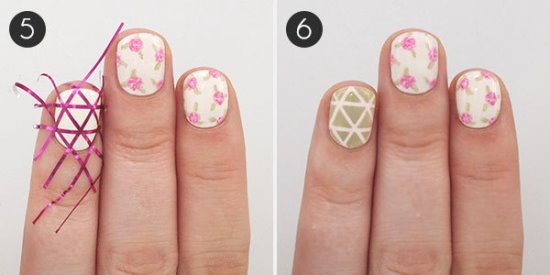
Image Credit: divinecaroline
7. White Velvet DIY Mani
Velvet polish gives a chic look to your nails, especially if they are white colored. This DIY nail art tutorial will help you achieve this beautiful white velvet mani for your nails. All you have to do is apply white polish on your nails and spray matching flocking powder on your nails before the white polish dries. To make it less messy, you can tape up your fingers around the nails.

Image Credit: themidwasteland
8. Funky French Mani
For this mani, you will require two colors of your choice and a scotch tape. Apply the first color black and let it dry completely. Take the scotch tape and first stick it to your palm to reduce the stickiness so as not to peel off the first paint off your nails. Make sure you’ve taped down correctly so as to avoid any leaking. Stick the tape according to the design you desire to create on your nails and paint it with the second color, green. Once you’re finished painting the second color, carefully lift off the tape and ta-da, you’re done. It is advisable that you do one tape at a time so as to avoid peeling off other nails’ paints.
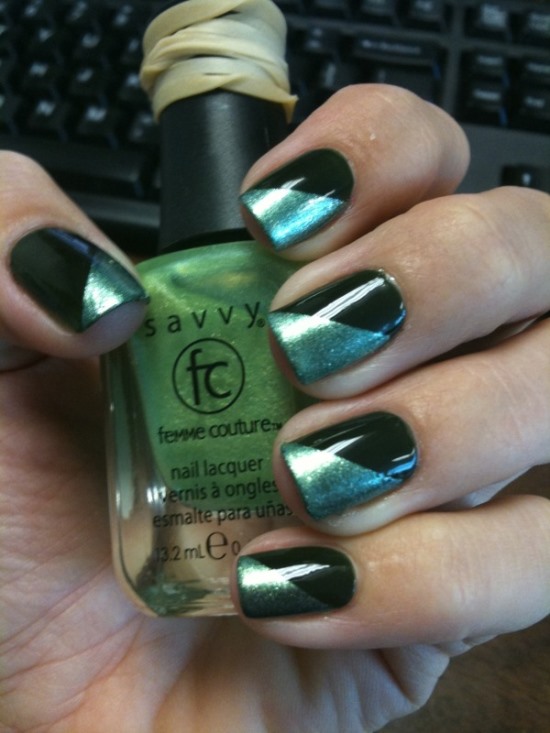
Image Credit: blogspot
9. Flying Birds Nail Art
To create this short nail art, paint your nails a thick white for the base coat. Then, using a nail art brush, paint a curved line and fill in a part of it with a dark colored polish such as black, which will make the bird’s body. Then paint a perpendicular curve through the middle and fill in the line. Then feather the bottom part of it to create the bird’s wings. Once finished with one bird, repeat the same process for as many birds as you want on your nails and do the same for the rest of your nails. To create a unique pattern, you may want to change the way you paint the birds on all your nails.
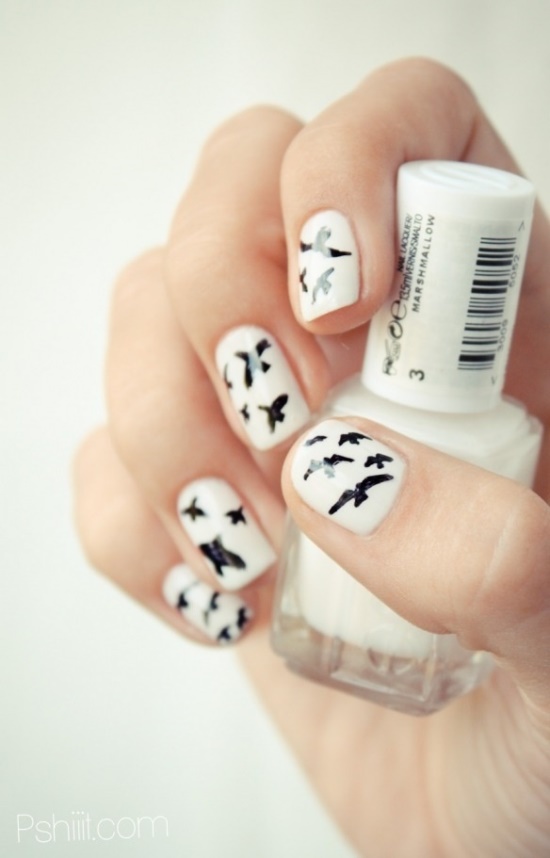
Image Credit: pinimg
10. Daisy Nail Art
This short nail design is very simple and easy to create. You first apply two coats of opaque white on all your nails. Using the thicker end of your dotting tool, create five large pink dots shaped as a flower on all your nails. Then, with the thinner end of your dotting tool, you create five smaller flower shaped dots of colors green and light peach. Dipped in gold polish, use the same dotting tool to create the center of your flowers. Apply a top coat and ta-da, there you are with a chic daisy nail art.
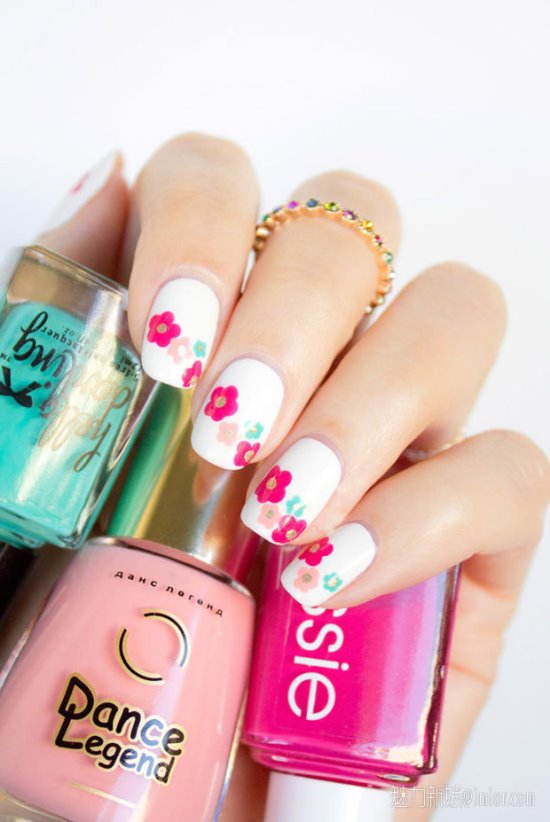
Image Credit: srcdd
11. Spring floral nail art
This nail art tutorial will teach you a simple method of creating this beautiful floral design at home. Start by applying two coats of light blue polish as your base coat. Let it dry. Then, take a cosmetic sponge and apply purple nail polish on to it and let the polish get soaked into the sponge. You then dab the sponge lightly on the upper half of your nails. Continue to dab the sponge until you get an ombre effect. In order to avoid messing up, apply each layer once the previous coat has completely dried down. Then take white polish and create rough circles on the nails for creating your flowers. Once done, draw small curved lines within the white circles with purple polish to create the petal effect. Finally, using your dotting tool, draw small dots with white polish on your featured nail. Finish the look by applying a top coat.
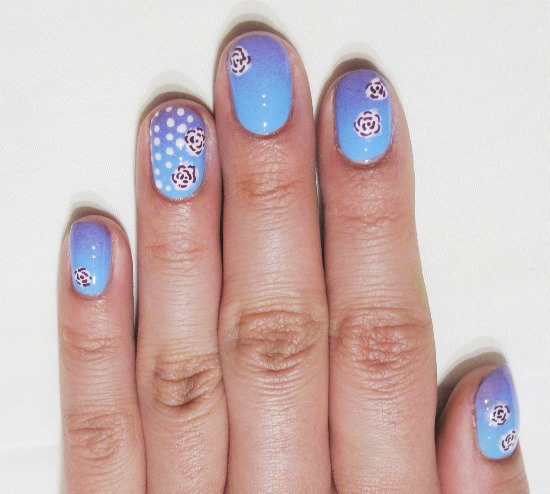
Image Credit: inspirationail
12. Frilly Nail Mani
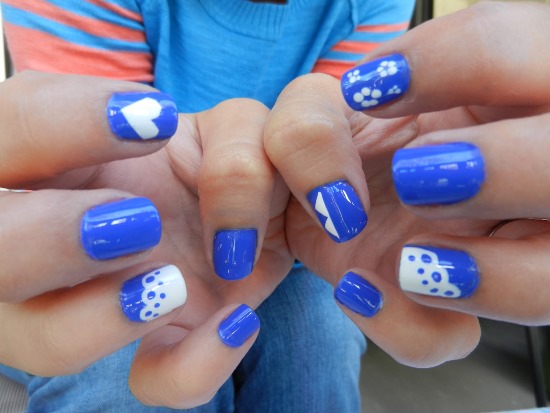
To create this mani, paint your nails with two coats of cobalt blue. Once it dries out, make the frilly pattern on one of your nail by drawing one stripe of white polish followed by a second shorter line. Continue the process till you reach the end of your nail. You then draw dots in each of the humps created with a dotting tool, using the same color as your base coat. You then draw a line of smaller dots just below the larger ones. To create the zigzag pattern, cut a freezer plastic bag of the shape and paint it with the opaque white polish. Place it on the nail and remove once the paint has dried completely. You then draw a heart shape with your dotting tool on other nail and fill it with the white polish. Finally, using the dotting tool, create a flower pattern on your nail, leaving two nail painting with the base coat on each of your hands.

Image Credit: blogspot
13. Newspaper Nail Design
To create this nail design, you first wash your hands with mild soap so as to remove all germs and dirt. Then apply a solid base coat on all your nails. Though optional, it is advisable that you apply base coat since it will protect and show the color better on your short nails. You then paint your nails with a light grey, nude, or light pink polish and let it dry completely before proceeding further. Next, pour a bit of rubbing alcohol into a cup and dip each of your nails in it for approximately 5 seconds. Take a piece of newspaper and press it firmly onto your nail for a few seconds. Peeling it off carefully, you will see that the ink from the newspaper is left behind. Repeat the same with all your nails and you’re done. Clean off the excess polish from your hands using a cotton bud and some nail polish remover. Finally, apply a top coat onto your nails, and this is necessary or the newspaper ink will rub off. Furthermore, the top coat will give your nails a shiny touch.
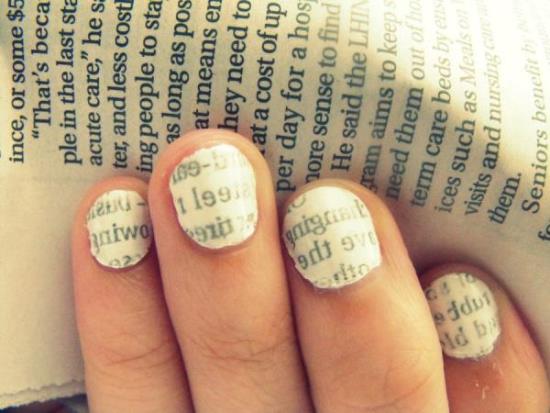
Image Credit: slodive
14. Polka Dots Mani
To create this easy polka dots mani on your nails, just follow these few simple steps with the simplest of tools. Paint your nails with any color of your choice for a base coat. But make sure that you choose two contrasting colors so as to make both colors equally visible (such as red and white in this case). Once the base color dries, take a bobby pin and dip the rounded portion of the pin into the second color. Create polka dots with the dipped rounded portion of the pin on your nails in any pattern you want. Once done, let it dry and then apply a top coat on all your nails, and you’re done!
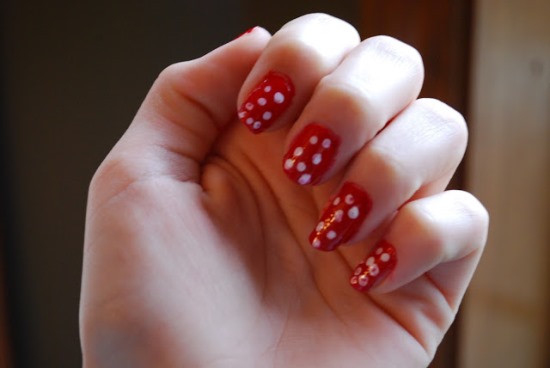
Image Credit: blogspot
15. Ombre Glitter Mani
This nail tutorial guides you on how you can create ombre glitter design on your nails. You first apply two coats of the base shade of your choice, but make sure that you let the first coat dry completely before starting with the second coat. Next, while the second coat is still a bit wet, dab the darkest glitter you have at the bottom of your nail bed with an eyeliner brush. Then apply a lighter shade of glitter just on top of the darker one. Repeat the process with all your nails and once finished apply a top coat. And there you are with a chic ombre glitter mani!
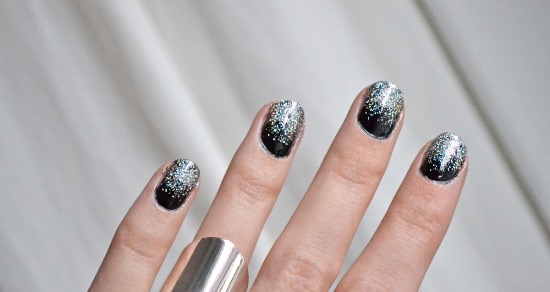
Image Credit: blogspot
16. Graffiti Nail Mani
Seventeen’s monochrome ‘Off The Wall Graffiti Nail Effect’ is a perfect way to get the graffiti nail mani. Paint your nails with tangy orange as your base coat and let it dry. You then apply a coat of the graffiti polish on your nails and you’re done! Top it off with a top coat to give it a shiny edge.
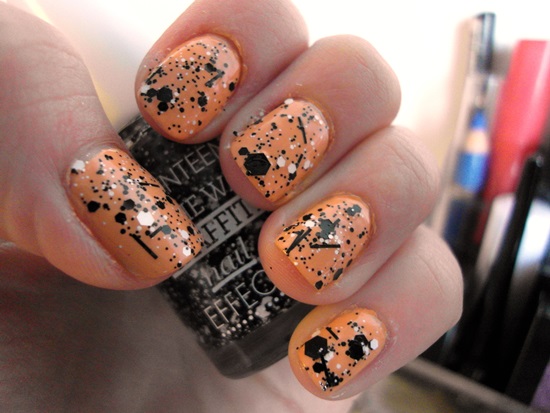
Image Credit: wordpress
17. Flower-on-the-tip Nail Design
To paint this short nail design on your nails apply nude polish as your base coat. Then, paint the tips of your nails with opaque white and let it dry. Once dried, draw flower petals as shown with blue polish on three of your nails. Whilst it is still white, using a nail art brush add a stroke of white within the blue petals to create the shady effect. Then paint the inside of the flowers with yellow and once dry draw dots with orange polish using a dotter tool. Apply a top coat and give your nails a finishing look with blue rhinestones.

Image Credit: naildesignguide
18. Cherry Blossom Nail Mani
Cherry blossom is often a favorite of many. To create this design on your nails, paint your nails with a light peach as your base coat and let it dry. Using your nail art brush and brown polish, draw the branches on your nails. Then with white polish draw the petals of the cherry flower against the branches on all your nails. Once done, using light pink polish draw a circle inside the flower and finish the look by drawing dots with a dark pink polish. Apply a top coat, and ta-da there you are with a gorgeous cherry blossom mani.
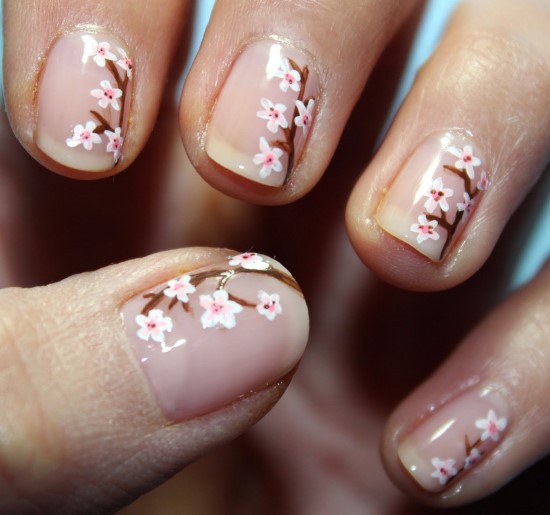
Image Credit: 2015nailart
Hope these fabulous nail art tutorials for short nails help you in bringing out your creative side.
 |
 |
 |
 |

About Rose Walker
Rose Walker has worked as a nail artist for over 10 years. She's gained a lot of experience and developed her own unique style during that time. When she was working at a famous nail salon, she met Shirlyn. The two of them quickly became friends, and eventually decided to start their own website together. Naildesignideaz is the result of their collaboration - it's a website where they share their experience and offer tips on how to create beautiful nails.
 |
 |
 |
 |
Popular Posts