by Rose Walker
Marble nail designs are a perfect way to jazz up your ‘style o meter’ and today, we are all set to show you the top 20 marble nail art tutorials that look cool and sophisticated. Marble nails may look complicated at first glance, but these are easy to be done, provided you have some patience and creativity. Lets take a look at these gorgeous nail art designs as we can’t wait to show them to you!
1. Mauve and black marble nail art
In a cup of water, pour drops of black, mauve and white paints in rings and cut through the pattern to create haphazard swirls. Then, dip your taped nails in a parallel way inside the water so that the design sticks properly. Remove the excess polish with an earbud. Take out your nails and remove the tapes. Clean the corners using a remover and dry. Seal with a top coat.

Image Credit: zzacura
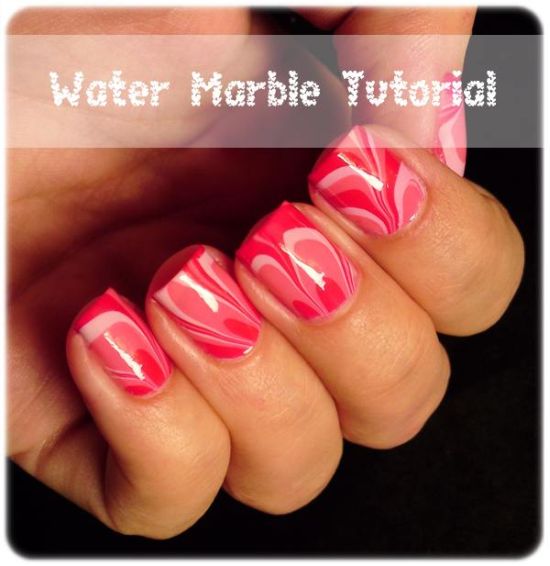
2. Red glitter and white marble nail art
Paint a coat of black after applying a base coat. Now, apply two coats of red glitter polish. Pour two drops of clear polish in a cup of water. Then, add two drops of white in the water to make rings. Take a toothpick and cut through the rings inwards to create a pattern. Make chevron patterns and dip your nails inside the water to get the design right onto your nails. Remove extra polish with a brush and take your nails out. Peel off the tapes and dry.

Image Credit: youtube
3. Black and white marble nail art
Like previous steps, take a cup of water at room temperature and add a blob of black, then white and repeat it alternately for about 8 times until you get desired rings. Now, with a toothpick, cut across these rings, starting from the middle, going all the way towards the edge of the cup. A floral pattern will be formed. Dip your nails inside and take it off after a few seconds. Remove the tapes and dry. Seal with a top coat retain the design.

Image Credit: tinytouchups
4. Dry marble nail art
Begin by putting a blob of white over a ziploc bag. Make an outer ring of red/orange around the white glob. Next, add another ring of green. Use a toothpick and cut inside till it reaches the white glob. Do this inwards and outwards to create a floral pattern. Dry the design and peel off the ziploc bag. Cut out patterns that will be pasted on to your nails after they are coated with a layer of clear polish.

Image Credit: sylandsam
5. Light blue and white marble nail art
Paint a light tone blue polish and apply a tape around the nails. Take a cup of water and add one drop of light blue and dark blue, in an alternate way. Do this three times. Now, from the middle, cut a line across to the side of the cup using a toothpick. Do a criss cross pattern all over and then dip the tips of your nails and let them go under water. Remove the extra polish away and take out your nails. Take off the tape and dry. Seal with a top coat.

Image Credit: nailitmag
6. Festive marble nail art
Apply a base coat and then paint the nails with a coat of glossy red or maroon. Now, add a few blobs of white gel nail polish over the maroon nails. Take a dotting tool or a toothpick to create swirl effect. This look is called marble nail art which you need to seal with a top coat.

Image Credit: usc
7. Valentines heart marble nail art
Take a cup of water and pour a blob of dark polish and then a lighter polish. Now repeat the step around four times. Using a toothpick, cut across to make chain of hearts by drawing a line straight from the center, reaching towards the edge of the bowl. Do the same from the opposite side. From the edge, make lines till the middle. Tape your nails and dip inside the bowl to get the marble nail art.

Image Credit: alldaychic
8. Yellow and black marble nail art
Take a ziploc bag and put a blob of yellow. Shape it up in a curved manner and then apply black. Repeat it several times and then using a toothpick, mix these randomly to create a swirly look. Press your nails over the pattern and wait till the design gets engraved. Dry and seal with a top coat.

Image Credit: nailarted
9. Blue and green marble nail art
In a cup of water, pour a drop of blue, then yellow, again blue and yellow until many rings are formed. Use a toothpick to make lines starting from the edge of the cup towards the center of the blob. This will create a floral marbled look. Dip your nails inside after taping them. Take out your nails and remove the tapes. Dry and seal with a top coat. Marble nail designs like this look attractive and very refreshing.

Image Credit: youtube
10. Heart shaped marble nail art
Paint any color of your choice (cream) and directly apply white dots, totaling to three in a slightly curved manner. Take a needle and cut through these dots to resemble small hearts. For the ring finger, first, paint white and then repeat the steps with the cream polish. Seal with a top coat.

Image Credit: naildesignvideos
11. Light blue marble nail art
This is one of the coolest and easiest nail tutorials to be done at home. All you need are two shades of blue, one in lighter tone and the other a darker variety that has shimmer. Pour a few blobs of both these shades over a foil and mix up with a toothpick. Now, press down your nails on the foil and get the design. Seal with a top coat once dry.

Image Credit: nail-lacquer
12. Candy cane water marble nail art
Apply a base coat and then two coats of white. Now, take a cup of water and pour a drop of white and make a ring. Do it a few times until several rings are formed. Now, pour a few drops of red and make similar rings inside in such a way that the last ring formed is in red. The rings of alternate colors (red and white) will be broken in a criss cross manner to form a design. Dip your nails inside after taping them. Take out your nails once the design has stuck completely. Dry and seal with a quick dry top coat.

Image Credit: youtube
13. Glittery blue and green marble nail art
Coat your nails with a base color and then apply two coats of blue on all nails. Put blobs of blue and green over a plastic wrap and mix them using a toothpick. Press down your nails over this mix one by one. Once dry, apply a top coat of glitter polish and seal the nail art.

Image Credit: zzacura
14. Pink and white water marble nail art
Tape the corners of your nails and take a cup of water. Now, pour blobs of light pink, dark pink and white, one after the other around seven times. Take a needle and cut through the rings, starting from middle and going up towards the edge. Then make criss cross lines to create a marbled look. Dip the surface of your nails inside the water and let the design stick. Dry and seal with a top coat polish.
Image Credit: nailartsdesign
15. Colorful marble nail art
After applying a nude shade as a base coat, put tapes around the nails. Take a bowl of water and drop a few blobs of polishes (different shades) one after the other till rings are formed. Cut through these rings using a needle to make innumerable lines. Dip your nails into the ring pattern and wait. Take out your nails and remove the tapes. Using a Q tip, remove the extra polish from the corners of each nail. Dry and apply a top coat.

Image Credit: diyready
16. Orange marble nail art
Apply two coats of white on all nails after painting with a base coat. Then, using a brush, make random strokes in various bright colors as you feel. Take a cling wrap and press it down over the nails one by one. This will create a swirly marbled look and you are done!

Image Credit: zzacura
17. Water marble nail art
Coat your nails with a fast drying base coat. Now, paint the nails with white color. Apply two coats. Next, put sticky tapes but just avoid touching your nails. Take a cup of water and put blue. Dip your brush in yellow paint and make a ring design on the water surface. Take a toothpick and drag inwards from the third ring. Now, dip your nail over the ring design and keep it for sometime. Take your nail out and remove the tapes. Dry. Seal with a top coat.

Image Credit: instructables
18. Flames of fire marble nail art
Make rings in white, red, black and yellow to create a marble pattern. Using a needle, cut across the pattern, starting from the edge of the design, going right towards the center and ending up at the opposite edge. Cut many lines from the edges of one side so that these form a V shape. Dip your nail inside so that the pattern sticks to it and take it out while removing all the extra polish.

Image credit: youtube
19. Blue candy swirl dry marble nail art
Apply a main coat of medium blue polish after base coating the nails. Use the same shade to paint over the lower portion of the nails and on the top. Put a few blobs of matching colors like purple randomly over the nails. Take a cocktail stick or a toothpick to make gentle swirls all over. Dry and seal with a top clear coat.

Image Credit: claire-victoria
20. Black and yellow marble nail art
Paint all nails in pink except for the ring fingernail that has to be colored in white. Put a tape around your nail and pour a drop of pink polish into the water. Then put yellow, and then black. Repeat the steps until you form a bulls eye. Take a stick or a toothpick and drag it inside, down towards the center of the bulls eye. This will create a marbled look. Next, dip your nail parallel into the design and wait. Take your nail out and dry.

Image Credit: nailartsdesign
The water marble nail art tutorials shown above are simply fabulous. These nail designs were developed by Japanese and are now becoming a regular trend worldwide. With intricate patterns and designs, these nail tutorials are definitely going to be loved by gals who want to look sassy. If you like any one of these, try out today and tell us how it went!
 |
 |
 |
 |

About Rose Walker
Rose Walker has worked as a nail artist for over 10 years. She's gained a lot of experience and developed her own unique style during that time. When she was working at a famous nail salon, she met Shirlyn. The two of them quickly became friends, and eventually decided to start their own website together. Naildesignideaz is the result of their collaboration - it's a website where they share their experience and offer tips on how to create beautiful nails.
|
|
|
|

Popular Posts