Anchor nail art tutorials like the ones shown in today’s post will open up your minds to these cool designs and make you fall in love with these once again! An anchor stands for stability and perseverance and is held in high respects by people belonging to the sailor community. But, of late, this trend has caught the fancy of young gals that want to look sassy and chic. Come take a look as we list down the top 18 anchor nail tutorials for you to enjoy!
1. Polka Dots Anchor Nail Art
To get this amazing Anchor nail art, you would need a bottle of black nail polish, white crème nail polish by Wet n Wild and a dotting tool to make dots. Start by painting your nails with white crème paint. Once dry, dip the brush in black polish and make strips on the nails as shown. For the anchor design, use a fine brush to make it. For the polka dots, use a dotting tool and let the nails dry up. Seal the design using a transparent top coat by any brand.

Image Credit: cuded
2. Anchor and Stripes Nail Art
Start by applying base coat of nude paint on all nails. Now, leaving the ring nail on which you need to paint blue color, use white for all the other nails. Then, make a dot on the blue nail using white shade after which make a line down the dot. Draw a curve at the bottom of the design. Make a line that cuts through the middle. For the arrows at the end of both the curves, use white again. Dry and then make a dot inside the white dot. For the stripes, paste stripes on nails and paint blue all over them. Now, peel off the stripes to reveal a stripped look. Seal with a top coat polish.

Image Credit: ytimg
3. French Tips With Anchor Nail Art
These anchor nails look great in summer and you would need a bottle of hot pink shade, a base coat, a transparent top coat and white polish. Start by painting the French tips using white paint, except for the ring finger which needs to be painted with hot pink. Let the nails dry and then using hot pink, paint the bottom of the half moon of the tips. Dry. For the anchor design, use a dotting tool to make the dot. Make a line down the dot and proceed to make curves. Draw a middle line and make arrows to complete the look. Seal with a top coat of transparent shade.

Image Credit: pinimg
4. Cool Blue, White and Red Anchor Nail Art
Nail art tutorials like this cool and summery anchor nail art lend a distinct charm to its wearer. You would need shades of blue, white and red. Coat your nails with each of these shades as seen in the image. For the blue and red nails, you would make stripes and for the white, you would make an anchor design. For the thumb, paint using metallic gold. Now, using a dotting tool and golden metallic shade, start making the anchor, beginning with a circle. Now, make a line down the circle using a brush. Now make the curves as shown to represent the hooks. For the stock, paint a horizontal line. Make a dot with white and you are done.

Image Credit: popsugar-assets
5. Blue Anchor Nail Art With Beads
Paint all your nails with white as base coat. Dry. Now, for all the nails barring the ring finger and thumb, make stripes using brush. Let the nails dry up. For the anchor, make a ring on the top followed with a line under it. Now, make the curves to represent hooks and a middle line to show a stock. Dry. For the thumb, make a floral design using blue. When the paint is still wet, stick beads to resemble a string and a star as shown.

Image Credit: blogspot
6. Cute Anchor Nail Art in Gold
Nail tutorials involving anchors look chic and stylish for all age groups and for this amazing nail art, you would need shades of white, blue and metallic gold. Paint your nails with white as base coat. Dry. Now, using a brush and blue shade, make stripes as seen. Dry. For the anchor motif, dip your dotting tool in gold shade and start making the ring, followed with a line drawn under it, a middle line to represent the stock and the curves. Make arrows to finish the look. Seal with a top coat.

Image Credit: fashionmio
7. Multiple Anchor Nail Art
Paint your nails using white color as base coat. Dry up. For the stripes, stick stripes once the coat is still wet. Then paint with red and blue shades. Peel off the stripes to reveal a striped look that looks gorgeous. Once the nails dry up, make small anchor designs towards the tips of the nails using black paint and stripping brush. Seal with a nude top coat.

Image Credit: blogspot
8. Pink Anchor Nail Art
Paint nails with a base coat of white, orange and glitter polish. The glitter polish has to be used for one nail as seen. Once the nails dry, start making the anchor design using pink. Start by making a ring and then draw a line under it. Make curves and follow it up with two arrows. Make a stock and at the end, make a dot using black. Seal with a top coat.

Image Credit: pinimg
9. Bright Red and White Anchor Nail Art
Paint all nails with red shade. Dry and then using white nail paint and a dotting tool, start making the ring, then the line under it, the stock, the curves and two arrows. Seal with a top coat.

Image Credit: etsystatic
10. Stylish Gold and Black Anchor Nail Art
For these spectacular anchor nails, you need blue, white, black and golden metallic polishes. Paint the nails with blue as base coat. Stick stripes and then paint using white all over them. Now, peel off the stripes. Dry. On the thumb, make a design of a star using black. Use a brush to make the star and let it dry. Paint with gold on the other half of the star. For the anchor, use golden for filler and black for the outline.

Image Credit: slodive
11. White and Golden Stripes with Beaded Anchor Nail Art
Paint using a base coat of blue. Take a brush and make horizontal stripes with white water color. Take your golden tape and outline it on the white stripes as seen. Dry. For the anchor nail, add a top coat of clear polish and stick golden beads using a dotting tool.

Image Credit: ytimg
12. Fashionable Anchor Nail Art
You will need red, blue, golden and white nail polishes for this awesome nail art. Paint using red polish on two fingers. For the index finger, paste a tape cut out in a perpendicular shape and put it on the moon of your nails. Now, paint it white. Peel off and then paint using blue and underline it with golden shade. For the anchor, paint with white base polish and make the design with blue.

Image Credit: nailthataccent
13. Glittery Anchor Nail Art
Paint the nails, except middle finger, using pink. For the middle finger, paint it with silvery glitter color polish. Press strips on the ring finger and apply a coat of white. Then peel off the strips. Dry and then using black, make the anchor design. At the end, use a dotting tool to fill up the ring portion of the anchor.

Image Credit: cuded
14. Jazzy Anchor Nail Art
Paint the pinky, thumb and the index with blue. For the middle finger, paint in white, while for the ring finger; apply silver glitter as base coat. To make the anchor, use blue to draw the ring, the line below, the stock and the two arrows.

Image Credit: pinimg
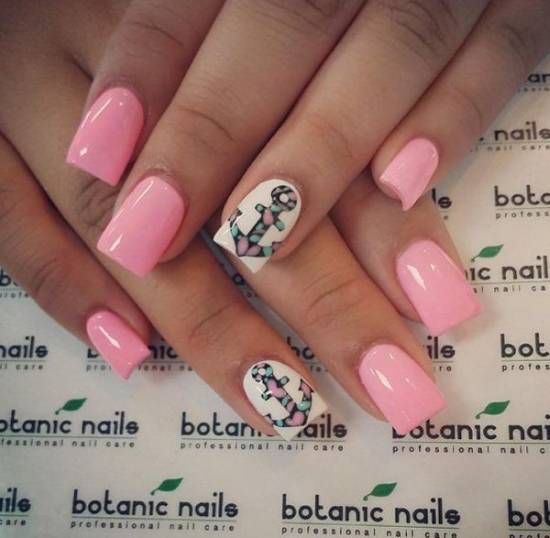
15. Creative Pink Anchor Nail Art
Paint all the nails except that of ring finger with baby pink. For the ring finger, paint it in white. Dry. For the anchor, use black shade to make the ring, the line, the stock and curves. Once the color has dried, use a dotting tool and make imprints inside the anchor with pastels.
Image Credit: cuded
16. Black and White Anchor Nail Art
Paint with black as base coat. Once dry, using a dotting tool, make polka dots. For the anchor, draw the circle, the line under it and the curves with white. For the stock, use red shade. Line the moon of the nails with red.

Image Credit: deviantart
17. Bright Yellow and Green Anchor Nail Art
Paint the nails with white as base coat. Repeat the step. Dry. Now, using bright yellow and a brush, make wavy pattered stripes on all nails except the one where anchor has to be painted. Paint the anchor using light green. Seal the design.

Image Credit: pinimg
18. Grey Anchor Nail Art
Paint your nails with a murky pink nail polish. For the shimmering chain designs, use a brush and metallic color. For the anchor, use grey to draw the ring, the line under it, the stock and the curves with arrows.

Image Credit: photobucket
All the above 18 anchor nail art tutorials are impressive and will make your nails rock for any occasion. Read the post carefully and do tell us if it inspired you!
 |
 |
 |
 |

About Shirlyn Ramos
Shirlyn Ramos has worked as a manager for a famous nail salon chain for over 10 years. She's seen it all, and now she likes to share her experience with others in the hopes of helping them create beautiful nails. When she's not busy with work, Shirlyn enjoys spending time with her family and friends. She loves going on walks and exploring new places.
|
|
|
|

Popular Posts