Wedding nails must look glamorous and astounding as a wedding is the most special day in a girl’s life, and as such, her nails must appear ‘diva like’ when she walks down the aisle with the love of her life. Today, we are offering our belles that are soon going to tie the knot, 20 most striking and beautiful looking wedding nail designs that will add to your glorious appearance. Most of these nail art tutorials are easy and can be perfected once you get enough practice. Therefore, if you desire to possess a royal look, try out these super awesome wedding nail art and feel sexy!
1. Garden party wedding nail art
Garden party nail designs for weddings are in fashion big time because of their fresh and charming appearance. Today, we are bringing a very chic wedding nail art that would make every bride blush, with style oozing out in gallons! Lets begin the tutorial whereby you start with painting your nails with white and lavender. Here the brands used are Brigitte-Classic with a Twist and Elisa (Boho Glam). Take a foil and pour over a blob of each polish on it. Take a dotting tool and make small dot like designs over the thumb and middle finger nail. Extend the designs to look like flowers. Clean the tool and dipping it in white, make dots at the middle of each flower. Create polka dots on the nails as shown. Now, make leaves using green polish. Seal with a top coat.

Image Credit: julep
2. Black and white wedding nails
The wedding nails shown below in black and white look extremely sassy and are prefect for a bride who is tying the knot. Start by applying white polish on all the nails as base coat. Dry. Using a freehand and a fine nail art brush, draw a mustache design on the index nail. Dry, and then for the tuxedo design, draw the conical part of a triangle on the middle finger nail to replicate a tux, using black. Fill with black and make a bow followed with two black dots at the base. Similarly, for the dress design, draw an outline of a heart using black and fill up. Make a necklace in dots as shown. For the pinkie, draw a floral design and for the thumb, draw polka dots.

Image Credit: pinimg
3. Beautiful blue floral wedding nail art tutorial
Wedding nail designs with flowers are not just visually pleasing but are also fashionable. You need to begin with applying a base coat on all your nails. The color chosen for this can be light tone of blue. Once dry, take a dotting tool and apply a dot of golden metallic polish at the top part of your index and pinkie nail. On your ring finger nail, draw two floral designs using a darker tone of blue. Dry. Draw another two white flowers as seen. Make the flowers in a way that they over lap each other. Apply shading effect using any color you want. Add golden dots in the center of flowers and make leaves. Seal with a top coat polish.

Image Credit: julep
4. Golden green wedding nails
For this chic nail art, polish your nails with a glittery dark green paint as base coat. Dry. For the golden accented nail, cut a tape and paste it in a triangular form, with two strips on either sides. Apply thin strips criss crossing each other as shown. Now, paint a golden metallic polish aver the tapes. Once dry, pull off the tapes to reveal the golden triangular accent. Stick a stone or a sticker at the tip of the design. Apply a top coat of clear polish and seal the design. Nail designs for weddings like these can make any bride look like a queen!

Image Credit: wavygirlhairstyles
5. Easy black bow wedding nail art tutorial
This is a very simple take on bow nail designs for weddings, but still manages to hold everyone’s attention by its sheer style quotient. Begin by painting nails with a base coat of white. Let the nails dry. Now, using black and a nail art brush, draw an extended version of x, followed by closing the ends with vertical lines. Leave on for a minute or two, and then, fill using black. Once dry, apply a top coat to seal the nail art.

Image Credit: ytimg
6. Stunning lace nail tutorial for weddings
Lace nail art designs are perfect to be flaunted when you are about to take the big step, aka, a wedding. These look elegant just like the one we are showing you. For this, you will be using actual lace and a few polishes, and glue. Start by applying a base coat of nude or white. Dry. Cut pieces of lace to fit your nail area. Now, add some glue and stick these lacy pieces on each nail. If you have extra edges coming out from your corners, clip using a cutter. Seal with a top coat.

Image Credit: blogspot
7. Simple wedding nail tutorial with silver strip
A yet another elegant nail art to be worn on weddings is the silver strip nail design shown below. All you have to do is paint your nails with a base coat of white by any brand. Dry. Now, cut very thin silver metallic strips from a silver sheet with scissors, or buy silver strip kit, keeping these ready to be used subsequently. Apply some glue or a coat of nail polish, and stick the strips horizontally towards the tips using a dotting tool. Clip off any extra edges. Seal with a clear coat polish.

Image Credit: nailcentric
8. Elegant wedding nails for girls
Paint a base coat of nude or clear polish on all your nails and let them dry. Take a make up sponge and apply two strips of white on it. Dab the sponge with the white on all the nails in a way that the two colors blend, with white setting firmly towards the top of each nail. Dry. Using a brush, and more white, make dots all over. Let the nails dry and now, make silver dots or blotches randomly wherever you want. Seal with a top coat. Wedding nail designs with silver and white are always loved across continents.

Image Credit: ytimg
9. Nail art tutorials with silver and white
Silvery nails enhance a bride’s style quotient which seems to soar higher into the limitless sky once you add a touch of swirly white designs to it. This is what has been done here. Start with painting your manicured nails with a clear coat of nude polish. Dry. Now, using a nail art brush and white, draw a swirly pattern, extending from the tip and going down towards the base. The look is curvy. Once dry, fill the portions on one side of the white swirl with silver glitter polish. Seal with a top clear coat.

Image Credit: 2016weddingdress
10. Nude glitter wedding nail tutorial
Nail art tutorials with nude nails are the best for such gals that want to project a sophisticated look at their wedding. Going perfectly well with a white wedding dress, these nails look dazzling for day wear. Start by applying a base coat polish of nude on all the nails. Dry and then using a brush and glitter polish, paint over the nude to add a shimmering touch. Paint the glitter a little thickly towards the base, and very thinly towards the tips. Seal with a top coat.

Image Credit: brides
11. Golden glittery nail tutorial for weddings
Golden shade lends a bit of opulence to any nail, specially a bride’s. You can wear this simple golden tipped nail art if you do not want to look too cheesy or too garish. Just apply a base coat of clear nail paint on all the nails and dry up. Using a brush, dip it in a bottle of golden glitter polish, and paint on the tips, leaving the rest of the nails natural. Dry and then apply a top coat. Wedding nail designs with golden accents suit every bride and her attire. You can add a few variations to this nail by using stones or other shades as well.

Image Credit: towedding
12. Floral wedding nail tutorial
For this amazing nail art, you can go in for acrylic nails, or else, french manicure your tips by applying white. Apply a base coat of clear polish and let the nails dry. For making the floral designs, use a brush and pink or red polish to make the petals. For the leaves, use green and make two at the base of each flower, and one on the tips. Add shading inside the flowers like shown. Paint a top coat. Floral wedding nails are very popularly worn by women at their weddings because of their feminine appearance.

Image Credit: manicurefantasy
13. Beautiful floral wedding nail design with golden beads
In order to get these amazingly chic nails, start by painting nails with baby blue and white acrylic polish. Use a fine nail art brush and white polish, draw outlines of petals in such a way that floral patterns cover the entire length and breadth. Now, stick a golden bead at the middle of each flower to accentuate its look. Seal with a top coat of clear polish. Golden beaded wedding nails accentuate your bridal look and give you an instant glow!

Image Credit: cuded
14. White hearts wedding nail design with rhinestones
Paint white polish on the nails that are to be embellished with rhinestones. You can use a gel polish for this purpose. For the others, paint using nude. At the nail bed of each nail, add golden just bordering the nail line. For the sweet white hearts, use a brush to draw them. Once dry, apply a dab of gold here and there to create a hint of this metallic touch. Its time to stick stones at the nail bed of white painted nails. Add glue and then paste these to achieve a super glam look for your wedding. Seal the design with a top coat of clear or glitter polish.

Image Credit: blogspot
15. Beautiful wedding green caviar nail tutorial
We have seen caviar beaded nails that blend well with sequined dresses, but the one shown below looks different and very natural. For you lovely ladies that love the green tones and nature, they can try this nail art for its very simple and cheap. Paint your nails using olive green or any lighter tone of this color. Dry the nails and then apply a coat of clear polish and before it dries, put green beads all over. The end result is awesome!

Image Credit: cannabride
16. Painted strokes wedding nail tutorial
Nail designs for weddings with blues, whites and greens look electrifying and this is what this painted strokes nail art brings before you – an eclectic look, perfect for a wedding! Start by painting your nails with white polish. Let the nails dry and then using a brush and various tones of blue, golden and green, just draw random strokes over them. Seal with a top coat.

Image Credit: fashionmio
17. Beautiful wedding beach nail tutorial
For this stunning beach nail art, start with applying a white coat on all the nails that are going to depict the sea, while, for the sandy nails, apply a base coat of nude. Taking a make up sponge, apply two strips, one each of turquoise and white. Now, dab the sponge on the white nails to blend the two colors to create a gradient effect. With the help of q tips and acetone, clean off the mess on the side of your nails. Using a stripper brush and white, make random wavy lines all over the nails. For the sandy nails, mix white, black and nude and apply little dots all over. Make the starfish using coral polish and nail art brush. Fill up and once dry, seal with a top coat.

Image Credit: blogspot
18. Beautiful blue Hawaiian wedding nail tutorial
For this floral Hawaiian nails, start by applying a base coat of Arctic Freeze white polish on nails. Dry for five minutes. Apply another coat. Once dry, take a stripper brush and dip it in blue paint to make floral petals as seen. For an accentuated look, draw curvy designs that replicate leaves on the side of the flowers. Draw another smaller sized flower below the main and then make small dots in the center of the flower, and the portions outside it. Seal with a top coat of clear polish.

Image Credit: nailitmag
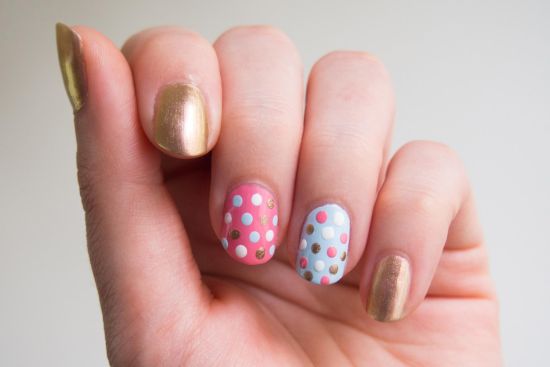
19. Stylish polka dot wedding nail tutorial
A romantic nail art for a romantic affair! For this nail design, start by painting a base coat with shades that you like. For example, for a few nails, paint using golden, while for others, choose pink and blue. Let the nails dry. Take a tin foil piece and pour a little of all the polishes like golden, white, pink and blue. Now, with the help of a dotting tool, make dots on the nails. Seal the design using a top coat.
Image Credit: skim
20. Pink shattered glass wedding nail tutorial
Start by applying a nude base coat on all the nails. Dry. Now, paint a coat of any polish like light pink or cream. Once dry, take a cellophane piece and cut it into thin strips of varying sizes that will be used on the nails. Then, apply nail glue on the nails and start sticking these cellophane bits. Once done, cut off any extra edges using a cuticle cutter or clipper. Now, apply two coats of top clear polish all over and seal the design.

Image Credit: over-blog-kiwi
A girl wants to look fabulous and her very best on her wedding day, and nails are one striking feature that will be noticed by one and all on that special day. For looking like an epitome that defines beauty, a bride must adorn her nails with such amazing nail art tutorials that we have showed you above. You just need to follow some basic steps and get these super wow wedding nails in no time!
 |
 |
 |
 |

About Shirlyn Ramos
Shirlyn Ramos has worked as a manager for a famous nail salon chain for over 10 years. She's seen it all, and now she likes to share her experience with others in the hopes of helping them create beautiful nails. When she's not busy with work, Shirlyn enjoys spending time with her family and friends. She loves going on walks and exploring new places.
|
|
|
|

Popular Posts