by Rose Walker
Bow nails are ready to rock this season …well…almost any season! Today I am going to present 18 bow nail art tutorials that will make you look classy yet trendy. These nails have been seen not just on celebs like Lady Gaga but on women belonging to different walks of life. Read these nail tutorials to choose the best one that works for you.
1. Polka Dots And White Bow Nail Design
Start by applying a base coat of clear nail polish. Once dry, apply a coat of peach or any pastel as you desire. Dry. Now, with a sticking tool, stick shimmery polka dot stickers all over. For the bows, use a brush and some white acrylic paint to make circles on both sides as seen. Press the brush to make the circles resemble a bow. Apply a top coat. Now, stick golden beads in floral pattern as seen. Seal with two layers of top coat.

Image Credit: ytimg
2. Black Bow Nail Design With Polka Dots
Apply a coat of light pink nail paint as base coat. Dry and then using a dotting tool and black paint, make dots on the nails. For the ring fingers on both the hands, take a brush and dip it in black paint to make the bow designs on the tips of the nails as shown. At the end, stick a pink stud or bead just at the middle of each bow. Seal with a clear top coat.

Image Credit: nailartgallery.nailsmag
3. Elegant Pink and White Bow Nail Design With Stones
Apply a base coat of pink on all nails. Once dry, take your brush and make two triangular shapes near the tips of the nails as shown. A few bows can be made diagonally or in any direction as you want. Using the brush, draw the ribbons under the bows. Stick a stone in the center of each bow as in the image. For the rest of the nail, stick a bigger stone and follow it up with a string of smaller stones for a glam look. Seal with a top coat.

Image Credit: deviantart
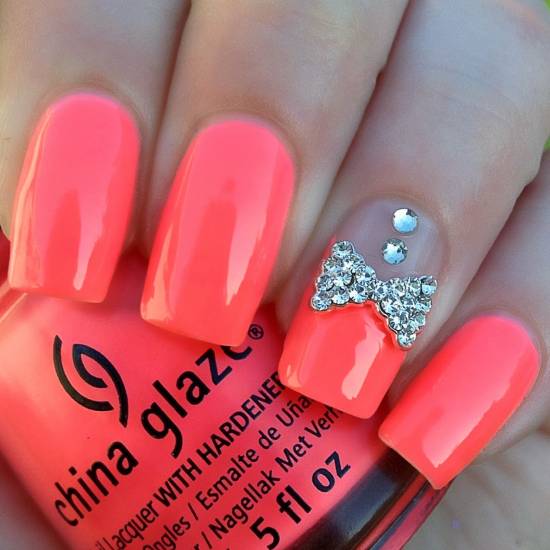
4. Dazzling Bow Nail Design With Rhinestones
For this amazing bow nail art, you can use any light color as base coat. Apply the base coat on all the nails except for the ring finger which has to be left a little blank towards its lower portion for bow art. Now, take a sticking tool and stick rhinestones, say 10 on each triangle, one by one. At the end, paste another stone in the middle. For the ribbon effect, stick two more stones under the bow vertically. Seal the design with a top coat.
Image Credit: latestfashiontoday
5. Eclectic Pink Bow Nail Design With Polka Dots
This is a very pretty nail design involving pink and white. Paint your nails with pink as base coat except for the ring finger that has to be painted using very light shade of pink. Once dry, use a dotting tool to make dots in white color. In the middle of the nail, start making two triangles to form a bow, and a bigger dot at the center. For the impression of the ribbons, use a brush and light pink to make the strings. Seal with a top coat.

Image Credit: pinimg
6. Pink And Mauve Nail With Jeweled Bow Design
For these gorgeous claw nails, you ought to decorate them with bow nail designs as this one. Paint them in pink and mauve as base coat. Then, stick the bow jewel on any of the nails as you like. This is one of the easiest bow nail art tutorials that can be tried by young gals too.

Image Credit: fashiondivadesign
7. Black And Pink Bow Nail Design With Silver Glitter
Paint the moon of your nails with a base coat of light pink and dry. For the middle finger and the pinky, line the border of the moon with silver glitter using a detailing brush. For the index and ring finger, make bows in black and line these with silver glitter as seen. Apply a top coat and then stick a heart shaped jewel at the middle. You can make polka dots for the other two fingers.

Image Credit: trendymods
8. French Manicure With Bow Nail Design
Two colors have to be applied, black and white on French tips. Apply a clear coat polish on all nails. For the black French tips, stick jeweled bows in white and black. These bows can be stuck in a tilted manner as seen in the picture.

Image Credit: pinimg
9. White Polka Dots With Black Bow Nail Design
Paint your nails with a base coat of clear polish. Now, using black, line the moon of all the nails. Make bows with black. Fill the tips with red paint and dry. Make polka dots with a brush and white polish.

Image Credit: thebeautyinsiders
10. Elegant Red Nails With Golden Bow Design
Paint a top coat of red color, and repeat it again. From your stickers, cut out golden bows and strips. Stick these on all the nails in a slanting direction. Apply a top coat of glitter to lend shine.

Image Credit: lebeauty
11. Purple And Silver Bow Nail Design
Apply a top coat of clear polish. Now, paint the tips of the nails using purple shade and line it up with glitter. Merge these two shades a little using a brush. Take a silver foil and cut out strips to stick them on the glittery portion of the nails as seen. Cut out heart shapes too and paste these like in the image. Apply a coat of clear polish and a little glue to stick the bow jewels on the nails.

Image Credit: trendymods
12. Bright Red And White Bow Nail Design
You will need base coat, white paint, top coat, red nail polish and brush. Start by applying a base coat on the nails. Now, apply two coats of red polish. Use a brush to make white bows. First, the dot has to be made followed up with two bows or triangles. Make two ribbon like stings too. Seal the design with a top coat clear polish.

Image Credit: ytimg
13. Shimmery Red And Golden Bow Nail Design
Paint your nails with shiny red polish and dry. You will make a bow for the ring fingers on both the hands using golden polish and brush. But firstly, use the golden polish to draw a plus symbol on the nails. Thereafter, make the bows and ribbons with a steady hand. Just draw a line or two randomly around the bows. Seal with a top coat.

Image Credit: blogspot
14. Cute White Bow Nail Design With Rhinestones
For these nails, start by applying base coats of white and any other lighter shade of green, blue or pink as you may like. Now, use a brush and white paint to make a vertical line as seen. Use acrylic paint to make the bows one after the other and position them in such a way that they touch the vertical line in a slanting manner. Apply a top coat and stick two rhinestones, like in the image. For the other nails, stick rhinestones in blue and white after coating your nails with a clear coat.

Image Credit: cuded
15. Beautiful Blue Nails With Pink Bow Design
Layer your nails with light blue paint as base coat. Re- apply. Now, take the bow shaped stickers from Betrousse Box purchased and stick it over the nails. Now, apply a coat of clear polish and stick the stones in the middle of each bow. Seal with a top coat.

Image Credit: photobucket
16. Classy Pale Pink nails With Black Bow And Dots
You can either grow your nails long or stick acrylic nail extensions for this bow nail art. Coat a base paint of pale pink on all the nails. Once dry, use a dotting tool to make polka dots in black. For the ring finger, make curvy lines, three in number just where the dots end and make the bow with ribbons. Dry and then make tiny lines in white inside the bow. Seal with a top coat.

Image Credit: slodive
17. Elegant Black And Beige Bow Nail Design
Paint your nails with a clear coat as base color. Then, use beige to paint over the nails. For all the fingers except the middle finger, use black to paint the diagonal half of the nails. Now, make small arches on the border of the design as seen. Use a dotting tool to make small dots under the arches. For the middle finger, use the dotting tool to make small dots in black lining the nail. Apply top coat and then, take a sponge and make a small bow in black. Cut it out and stick it once you have glued your nail.

Image Credit: ytimg
18. Gorgeous Striped Nails With Red Bow
This nail art looks good on long nails. You need to paint your nails with a base coat of white and then paste strips vertically. Now, apply a coat of black polish over the nails and peel off the strips to reveal gorgeous strips. Using acrylic red paint, make the first bow, then the dot in between, followed with another bow. Coat your nails with a layer of top coat of clear polish.

Image Credit: cuded
Bow nail designs look attractive and can suit any occasion. From easy to complex bow nail tutorials showcased today, you are free to select the one or as many as your heart desires. Do shower your precious comments and let us know how you feel about this post! Ciao!
 |
 |
 |
 |

About Rose Walker
Rose Walker has worked as a nail artist for over 10 years. She's gained a lot of experience and developed her own unique style during that time. When she was working at a famous nail salon, she met Shirlyn. The two of them quickly became friends, and eventually decided to start their own website together. Naildesignideaz is the result of their collaboration - it's a website where they share their experience and offer tips on how to create beautiful nails.
|
|
|
|

Popular Posts