Music notes when painted on nails look very creative and are making a glamorous entry into the fashion world. It was last week that I met one of my colleagues at a party and saw lovely looking music note nails that she was flaunting, much to my envy! So, I thought why not share a few rocking musical notes nail art tutorials with my readers who are ever ready to learn new tricks of looking glam and fabulous? Take a look as I bring you a list that will showcase the top 21 music notes nail tutorials that are cute and bubbly!
Contents
You would start by painting your nail tips with a base coat of white polish as seen. Then, using black polish and a fine brush, make the musical notes designs one after the other. Begin by drawing horizontal lines. Once dry, make the symbol of notes as shown in the image. Seal with a top coat.

Image Credit: pinimg
Start by painting nails with white polish. Dry and then with the help of black polish, make the musical notes designs as seen. The lines drawn should be curvy and artistic like the image shown below. Apply a top coat of clear polish.

Image Credit: ytimg
Begin by applying white paint as top coat for all nails except the ring finger that has to be painted with blue. Once dry, use a fine brush and black polish to make the designs of a hat, a guitar and notes and a face one after the other. Choose the designs that you would fill up with black. For the ring finger, use white to make the cute drawings as seen in the image. Seal with a top coat.

Image Credit: blogspot
Music notes seen painted in the picture below look cute and gorgeous with pink as the base color. Once the nails are dry, start making designs of musical notes and piano using black. For the fillers, make use of shades like yellow, blue, red and mauve, just as in the image.

Image Credit: wordpress
You can use a sponge to create this amazing mix of colors on the nails. Take a sponge piece and paint the shades of orange, light yellow, blue and pink on both its sides. Then, press down the sponge on the nails to stamp the colors. Once dry, use a black polish to make the designs.

Image Credit: ytimg
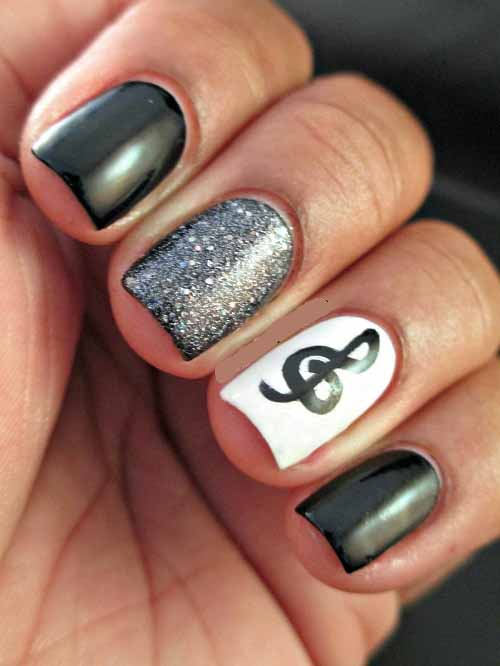
This is a simple nail tutorial where the nails have to be painted with black and silver glitter polish. Once the nails dry up, use black paint and a fine brush to make a musical note design on any one of the nails as seen.
Image Credit: fashionstyle
Firstly, paint the nails in a curvy manner so that only the tips and a corner of the nails get colored with white polish. Let the nails dry, after which use black paint to draw lines and symbols that resemble musical notes. Seal with a clear coat polish.

Image Credit: nailsmag
For getting this music note nails, start applying a base coat of clear nail polish. Dry and then, paint the tips with white. Dry the nails and now, make use of black shade to make the angular and horizontal musical notes designs all over as seen.

Image Credit: nailsmag
Firstly, use white polish to paint the tips of a few nails. For the rest, paint the whole portion and dry. Start making piano designs using black as seen in the image. For the wholly painted nails in white, draw the various symbols and let these dry. As the last step, sprinkle or paint a little glitter to add shine.

Image Credit: nailsmag
This nail art is one of the most glamorous among this list of gorgeous and cute nail art tutorials. You have to fix nail forms to your nails in a c shaped curve and square. Now, apply the sculpting gel on the forms. After this, file the fake or sculpted nails. Paint white gel polish in a diagonal manner on the pinky finger and thumb. For the middle finger and ring finger, paint using metallic silver colored gel polish. Press down a foil on the silver nail and then put it back on the middle finger. Use a brush to create the Gingham design as seen. Paint with red for the vertical design. At the end, use white paint to make musical notes on the wax paper. Cur the paper and stick it on the ring finger.

Image Credit: nailsmag
Apply a base coat of white polish all over the nails. Dry. Now, for the bottom portion, use a purple colored paint to paint the area. For the sky, use blue, and white to make clouds if you wish. Now, paint the top portion of nails with green polish. Dry. Using a gel pen, draw the silhouettes of birds in black. Dry and then, using black shade, fill the inner portions. Add musical notes here if you like.

Image Credit: instructables
Start with painting the nails, except the ring finger with purple polish. For the ring finger, paint using pink color. Once dry, take a brush and make a design with white. On top of the white, make a design of musical notes using black. Make another musical note design on the thumb.

Image Credit: nailpro
A very cute nail art, you need to paint nails with a base coat of cream polish, except for the ring finger that has to be painted with deep purple. Dry and then draw dots and a design of a musical note with black shade. Seal with a top coat.

Image Credit: sweetjellybean
For this glam nail art, you would need a blue nail paint, black paint, Konad nail stamp designs of musical notes and a top coat. Apply a base coat of blue and when a little wet, stick the musical notes stamped in black, directly onto the nails. Seal with a top coat.

Image Credit: blogspot
Apply glossy nail paint of any color and once dry, make use of a brush and make Japanese letters and musical note designs as in the image. Seal with a top coat.

Image Credit: blogspot
Paint your nails using a base coat of white, here it is Sinful Colors Snow Me White brand that's used. Take your Konad stamping plate and take out the design of musical notes, thereafter, stamp on each nail. Use black for stamping purpose. Apply a top coat that dries fast.

Image Credit: blogspot
Paint the nails with a base coat of white. Dry and then make designs of 'stereo heart' on middle and index fingers. For the ring finger, make a red heart with an image of stereos painted in black. Dry, then, make a musical note design, again using black and fill it up nicely. Once dry, coat it up with a top coat of glitter.

Image Credit: blogspot
Firstly, apply a base coat of shimmering mauve pink and dry. Coat it the second time and dry again. For the designs like guitar, treble clef, wavy musical lines and musical notes, use pink and teal shades as seen. Top it up with a gloss finished top coat.

Image Credit: blogspot
Paint your nails with white polish. Now, using a skin shade, make a circle. For the blue colored scarf, paint using blue shade and dry. For a stripped look inside the scarf, paint with a lighter shade of blue color. For the rim of the cap, paint using dark blue. For the main body, paint using the lighter version of blue. For drawing the bobble on top of the singer's cap, use the same dark blue shade. Use a dotting tool to make the facial features using black. Now, draw musical notes designs on either sides of the singer.

Image Credit: shewhodoesnails
Start by painting the nails with light yellow and pink shades. Once dry, using a brush, make musical notes with black and seal with a top coat.

Image Credit: stylishboard
Paint using light pink on all nails except the ring finger that has to be painted using glitter nail polish. For the designs, make use of a brush and black paint.

Image Credit: stylishboard
Looking at these lovely nail tutorials, I am sure you ladies must be going bonkers and can't wait to get one of these cutie pies on your perfectly manicured nails. Do have a look as these nails look classy and funky at the same time.
 |
 |
 |
 |

About Shirlyn Ramos
Shirlyn Ramos has worked as a manager for a famous nail salon chain for over 10 years. She's seen it all, and now she likes to share her experience with others in the hopes of helping them create beautiful nails. When she's not busy with work, Shirlyn enjoys spending time with her family and friends. She loves going on walks and exploring new places.
|
|
|
|

Popular Posts